Phase 3 - MISP Threat Intelligence Platform Deployment
Last updated by: Syed Mahmood Aleem Huzaifa, Last updated on: 29/06/2025
Document Creation: 17 May 2025. Last Edited: 23 May 2025. Authors: Syed Mahmood Aleem Huzaifa.
Effective Date: 23 May 2025. Expiry Date: 23 May 2026.
Overview and Initial Setup
The goal of this phase is to deploy the MISP (Malware Information Sharing Platform) instance and integrate it into the Automated Threat Hunting framework for use as a central threat intelligence platform.
It is preferable to deploy MISP on a separate system from the Wazuh Manager to avoid potential port conflicts and ensure better resource allocation and performance. This documentation assumes the use of a Kali Linux system for MISP deployment.
Before proceeding with the integration, users must first ensure that MISP is correctly deployed and populated with intelligence feeds. This foundational setup is already thoroughly documented by Redback Operations, which can be accessed using the link: MISP Setup
It is strongly advised to refer the following resources available in the above link before continuing:
- MISP Setup Guide – Redback Operations: This guide explains how to clone the misp-dockerized repository, configure the .env file for port and service adjustments, and launch MISP containers using Docker Compose. It also details the process of accessing the MISP web interface, default credentials, and generating API keys required for programmatic access.
- Automating Feeds on MISP (also within the above link): This section covers how to enable community and external feeds, automate synchronisation from CIRCL and other OSINT sources, and ensure that MISP is consistently updated with actionable threat indicators.
Once you have completed the steps in these documents and verified that MISP is running and populated with IOCs, continue with the integration steps outlined below.
Step 1: Creating a MISP Lookout script (custom-misp.py)
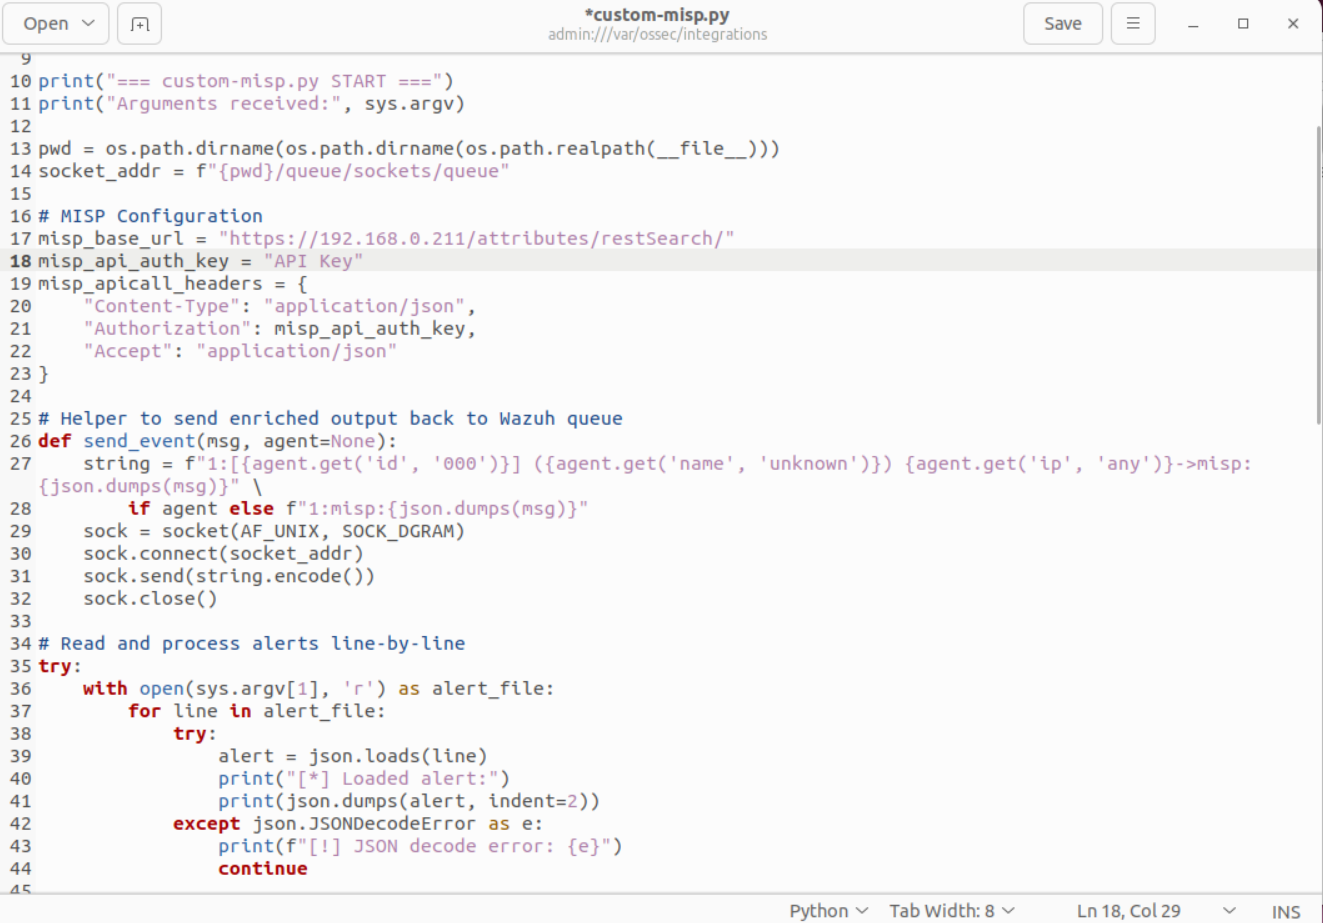
We will create the script using the command sudo nano /var/ossec/integrations/custom-misp.py
#!/usr/bin/env python3
import sys
import os
import json
import requests
import ipaddress
import re
from socket import socket, AF_UNIX, SOCK_DGRAM

print("=== custom-misp.py START ===")
print("Arguments received:", sys.argv)

pwd = os.path.dirname(os.path.dirname(os.path.realpath(__file__)))
socket_addr = f"{pwd}/queue/sockets/queue"

# MISP Configuration
misp_base_url = "https://192.168.0.211/attributes/restSearch/"
misp_api_auth_key = "<API Key>"
misp_apicall_headers = {
    "Content-Type": "application/json",
    "Authorization": misp_api_auth_key,
    "Accept": "application/json"
}

# Helper to send enriched output back to Wazuh queue
def send_event(msg, agent=None):
    string = f"1:[{agent.get('id', '000')}] ({agent.get('name', 'unknown')}) {agent.get('ip', 'any')}->misp:{json.dumps(msg)}" \
        if agent else f"1:misp:{json.dumps(msg)}"
    sock = socket(AF_UNIX, SOCK_DGRAM)
    sock.connect(socket_addr)
    sock.send(string.encode())
    sock.close()

# Read and process alerts line-by-line
try:
    with open(sys.argv[1], 'r') as alert_file:
        for line in alert_file:
            try:
                alert = json.loads(line)
                print("[*] Loaded alert:")
                print(json.dumps(alert, indent=2))
            except json.JSONDecodeError as e:
                print(f"[!] JSON decode error: {e}")
                continue

            alert_output = {}

            # Extract and validate IP address
            try:
                data = alert.get("data", {})
                ip = data.get("srcip") or data.get("src_ip")
                if not ip:
                    print("[-] No srcip or src_ip field found. Skipping.")
                    continue
                if not ipaddress.ip_address(ip).is_global:
                    print(f"[-] Skipping non-public IP: {ip}")
                    continue
                misp_search_value = f"value:{ip}"
            except Exception as e:
                print(f"[-] Error extracting IP: {e}")
                continue

            # Prepare MISP search
            misp_search_url = f"{misp_base_url}{misp_search_value}"
            print(f"[*] Querying MISP for: {misp_search_url}")

            try:
                misp_api_response = requests.get(misp_search_url, headers=misp_apicall_headers, verify=False).json()
                print("[*] MISP response:")
                print(json.dumps(misp_api_response, indent=2))
            except Exception as e:
                print(f"[-] MISP API error: {e}")
                alert_output["integration"] = "misp"
                alert_output["misp"] = {"error": "Connection Error to MISP API"}
                send_event(alert_output, alert.get("agent", {}))
                continue

            # MISP match handling
            if misp_api_response.get("response", {}).get("Attribute"):
                print("[+] MISP HIT: IOC match found!")
                attr = misp_api_response["response"]["Attribute"][0]
                alert_output["integration"] = "misp"
                alert_output["misp"] = {
                    "event_id": attr.get("event_id"),
                    "category": attr.get("category"),
                    "value": attr.get("value"),
                    "type": attr.get("type")
                }

                print("[*] Sending enriched alert:")
                print(json.dumps(alert_output, indent=2))
                send_event(alert_output, alert.get("agent", {}))
                print("[*] Sent to Wazuh.")
            else:
                print("[-] No MISP match found.")

except Exception as e:
    print(f"[!] Fatal error processing alerts: {e}")
    sys.exit(1)
The custom-misp.py script is a custom integration written in Python to enable automated threat intelligence lookups in MISP (Malware Information Sharing Platform) from Wazuh alerts. The script acts as a bridge between Wazuh’s alerting system and the MISP API. It processes incoming alerts (specifically looking for source IP addresses), queries MISP for matches, and if an Indicator of Compromise (IOC) is found, sends enriched results back to Wazuh.
When Wazuh triggers an alert and passes it to this script (typically through active response or custom integration), it begins by printing some debug output, including the arguments received. It then determines the absolute path to the queue/sockets/queue file—this is Wazuh’s internal socket where messages can be pushed back to its engine for correlation or logging.
The script reads the alert JSON file passed as an argument line by line (each line expected to be a separate JSON object), and tries to extract the source IP (srcip or src_ip). If no valid public IP is found (it skips private/local addresses), it proceeds to build a query in the format value: <ip> and appends it to the MISP API URL.
A GET request is then issued to MISP with this query. If MISP responds successfully and contains a match (Attribute found in response), the script extracts key details from the first matching attribute, such as event_id, category, value, and type, and constructs an enriched response.
This enriched output is then pushed back to the Wazuh engine through the Unix domain socket. This allows the matched IOC to be logged or acted upon by Wazuh. If no match is found, it simply logs that and skips enrichment. If an error occurs (e.g., MISP not reachable), an error message is created and also sent back via the socket.
Changes to be done in the script:
To make this script work in another environment, users will need to modify:
- misp_base_url: Change https://192.168.0.211/ to the actual IP or hostname of the system where MISP is deployed. It must include /attributes/restSearch/ as part of the endpoint.
- misp_api_auth_key: Replace the hardcoded API key with a valid API key from your own MISP instance. This is found in the MISP web UI under the logged-in user's profile.
- Optional – verify=False: If using a self-signed SSL certificate for MISP, leaving
verify=Falseis acceptable during testing. However, in production, it's recommended to set it to True and use a trusted certificate. This script is typically invoked by a shell wrapper (e.g., custom-misp) and triggered by an<active-response> or <integration>block in Wazuh configuration. The result is that Wazuh alerts that match public IPs get automatically checked against MISP threat intel, and any matching data is logged or used to trigger additional actions.
Once that is done the script needs to be made executable which can be done by chmod +x /var/ossec/integrations/custom-misp.py
Step 2: Create a Shell Wrapper
In this step, we are creating a lightweight shell script that acts as a wrapper to execute the Python integration script custom-misp.py. Wazuh's Active Response mechanism expects commands to be referenced by name, which internally calls the executable defined in its configuration. By creating a wrapper script named custom-misp, we enable Wazuh to call our Python script as if it were a native executable.
To create the wrapper file: sudo nano /var/ossec/integrations/custom-misp
Following the creation of the custom-misp.py integration script, a shell wrapper named custom-misp needs to be implemented within the /var/ossec/integrations/ directory to serve as an execution bridge between Wazuh and the Python enrichment logic. While earlier examples demonstrated a minimal wrapper, the version used in this implementation offers improved modularity and functionality.
Add the following content to instruct the system to call the Python script with any arguments passed:
#!/bin/bash

SCRIPT_PATH="/var/ossec/integrations/custom-misp.py"
CONF_PATH="/var/ossec/integrations/misp.conf"

# If run with -t (test mode)
if [[ "$1" == "-t" ]]; then
    echo "Running in TEST mode"
    python3 "$SCRIPT_PATH" /var/ossec/logs/alerts/alerts.json "$CONF_PATH"
    exit 0
fi

# Default (real-time Wazuh alert file passed as argument)
python3 "$SCRIPT_PATH" "$1" "$CONF_PATH"
Following the creation of the custom-misp.py integration script, a shell wrapper named custom-misp needs to be implemented within the /var/ossec/integrations/ directory to serve as an execution bridge between Wazuh and the Python enrichment logic. While earlier examples demonstrated a minimal wrapper, the version used in this implementation offers improved modularity and functionality.
This enhanced shell script not only invokes the Python integration but also introduces conditional logic to support both test mode and live response mode. In particular, the wrapper checks whether the script is being executed with a -t flag. If so, it interprets this as a request to run in test mode, wherein the enrichment logic is applied to Wazuh’s full alert log file (alerts.json). This enables developers and analysts to manually validate MISP connectivity and parsing accuracy without relying on real-time alerts or triggering rule-based responses.
Once the file is saved, make it executable so that Wazuh can invoke it during runtime: chmod +x /var/ossec/integrations/custom-misp
Step 3: Configure Wazuh Active Response
This step involves informing Wazuh about the new custom response command and defining when it should be executed. The <command> block in the Wazuh configuration file registers our wrapper script as a valid executable action, and the <active-response> block binds that action to a specific detection rule. This allows Wazuh to invoke the MISP lookup automatically whenever a specific rule is triggered.
Open the Wazuh configuration file for editing: sudo nano /var/ossec/etc/ossec.conf
<integration>
  <name>custom-misp</name>
  <alert_format>json</alert_format>
  <level>7</level>
  <group>authentication_failed,sshd,custom_rules</group>
  <rule_id>100100</rule_id>
  <rule_id>110000</rule_id>
</integration>
If you have copied the content of the ossec.conf then this should already be present, so you can skip or just replace it.
This configuration means that Wazuh will automatically invoke the custom-misp integration script for any alert matching rule IDs 100100 or 110000, provided the alert format is JSON and the rule is part of one of the specified groups (authentication_failed, sshd, or custom_rules). This method of invocation does not require manual management of <command> blocks or active response location directives like manager, agent, or local.
In practice, the integration block is simpler and more efficient when the goal is to enrich alerts or forward them for correlation, without actively triggering firewall or remediation commands. It is ideal for use cases like threat intelligence lookups, external enrichments (MISP, VirusTotal, etc.), and machine learning-based classification. Moreover, since it relies on alert metadata like rule IDs and groups, it can be finely tuned to respond only to specific types of security events.
After saving and exiting, restart the Wazuh manager to apply the configuration changes: sudo systemctl restart wazuh-manager
Step 4: Upload IOC Event in MISP for Testing
Before we can test whether our lookup mechanism works as expected, MISP must contain at least one known Indicator of Compromise (IOC) that the system can attempt to match against. This step involves manually inserting test data into MISP, which will later help us confirm if the integration between MISP and the SIEM or detection system is functioning correctly by triggering a correlation-based alert.
To do this, we first access the MISP web interface, which is typically available at https://<your-misp-ip> in the browser. If using a local setup like a virtual machine, this would often be the IP address of the machine hosting MISP on port 443, unless changed during configuration. For example, if your Kali VM is running MISP at IP 192.168.0.211, you would access it via https://192.168.0.211/. A certificate warning may appear on first access due to the use of self-signed certificates, which can be bypassed by clicking on advanced options and proceeding.
Once logged in to the MISP web interface using the admin credentials, navigate to the “Event Actions” menu and select “Add Event”. Fill in the event metadata with a basic title and threat level, then proceed to add attributes. At this stage, we insert test IOCs such as a fake IP address (e.g., 1.2.3.4), a dummy domain (e.g., malicious.test), and a placeholder SHA256 hash. These values are intentionally artificial but realistic enough to test lookup mechanisms.
After all desired attributes are entered, the event must be published. Publishing the event is crucial because only published events are exposed via the MISP API and can be retrieved during automated enrichment or correlation lookups. Once published, these indicators become accessible for tools like Wazuh, Cortex, or custom scripts to perform searches and validate if matches are being correctly identified and handled.
Step 5: Trigger Wazuh Alert and Validate MISP Lookup
With MISP populated with test indicators (IOCs), the next step is to validate that the Wazuh–MISP integration is functioning as expected. This involves simulating an event from a Wazuh agent that triggers one of the custom detection rules defined in the Wazuh manager, specifically one of the rule IDs listed in the <integration> block (e.g., 100100 or 110000). When such a rule is triggered, Wazuh will execute the custom-misp integration script, which will then query MISP for matching threat intelligence and return enriched context if an IOC match is found.
To perform this test, first ensure that the IOC you want to simulate (e.g., IP address 1.2.3.4) is already published in a MISP event. Then, simulate an activity from a Wazuh agent that would result in a log containing this IOC. For example, you could generate traffic to the test IP by executing the following command on a Wazuh agent system: ping -c 1 1.2.3.4
This will create a network event that can be picked up by Wazuh’s log collectors if appropriately configured (e.g., through syslog, Suricata, or any log source monitored via <localfile>). The event will then be parsed and, if it meets the conditions of the custom rule (matching group and level), Wazuh will generate an alert.
Since the current ossec.conf configuration uses the <integration> directive with rules 100100 and 110000, the triggered alert must match one of those rule IDs to invoke the custom-misp integration script. If needed, we can create or modify a custom rule that watches for network access to certain IPs and assigns one of these rule IDs.
For example:
<rule id="100100" level="10">
  <if_sid>65001</if_sid> <!-- Replace with appropriate parent rule ID -->
  <match>1.2.3.4</match>
  <description>Test IOC matched: 1.2.3.4</description>
  <group>custom_rules</group>
</rule>
Once the alert is generated and processed by Wazuh, the integration script will automatically run. To confirm this, monitor the Wazuh alert logs in real time using: sudo tail -f /var/ossec/logs/alerts/alerts.json
If the MISP lookup is successful, the script will append enrichment data such as event_id, category, and type to the alert, and you should see output like:[MISP] Match found for IOC: 1.2.3.4
This confirms that the IOC matched against the MISP threat database and that enrichment data was successfully pulled.
This enriched alert can also be visually verified using the Wazuh web interface (Kibana/OpenSearch Dashboard):
- Open the Wazuh Dashboard in your browser and log in.
- Navigate to the Security Events or Alerts module.
- In the search bar or filters, search for the matching rule.id (e.g., 100100) or the source IP 1.2.3.4.
- Click on the alert entry to open the expanded JSON view.

A similar output would be visible on Wazuh dashboard. This confirms that the enrichment was parsed back into the alert and stored with it, making it available for future correlation, visualisation, or escalation workflows. This enriched field can also be used to build custom dashboards or detection visualisations that highlight threat intelligence matches. By successfully completing this step, you validate that your MISP deployment is operational, properly populated with threat intelligence, and that your Wazuh integration is functioning as intended—capable of dynamically enriching alerts with context from MISP during live incident detection.