Phase 7 - Wazuh & The Hive Integration
Last updated by: Syed Mahmood Aleem Huzaifa, Last updated on: 23/09/2025
Document Creation: 3 September 2025. Last Edited: 9 September 2025. Authors: Syed Mahmood Aleem Huzaifa.
Effective Date: 9 September 2025. Expiry Date: 9 September 2026.
Overview
Phase 1 focuses on establishing the integration between Wazuh and TheHive so that security alerts generated by Wazuh are automatically pushed into TheHive as cases. The main goal here is to eliminate the manual step of copying alerts from Wazuh into TheHive, ensuring that analysts have a single central platform to investigate and manage incidents. This means that whenever Wazuh detects suspicious activity, it will trigger the creation of a case in TheHive, where the details of the alert can be examined and escalated.
To make this possible, both systems must already be properly set up: the Wazuh Manager should be actively running on the Ubuntu server where it was installed, TheHive should be online and accessible via its web interface, and you should have administrative access to both servers to configure API connectivity and permissions. This setup ensures a seamless pipeline where Wazuh handles detection and TheHive manages investigation, streamlining the incident response workflow.
Step 1: Preparing TheHive
Before Wazuh can send alerts to TheHive, we need to set up an organisation and create a user who can receive alerts through TheHive’s API.
- Create an Organisation
- Log into TheHive web interface using the admin account.
- Go to Administration → Organisations.
- Create a new organisation: Example - Redback.
- Create a User for API Access
- Inside your organisation, create a new user. o Role: Analyst (can receive alerts and create cases, but not change system settings).
- Set a password for this user.
- Generate the API Key
- Edit the new user profile.
- Click "Reveal" under API Key.
- Copy the key somewhere safe - you’ll need it in the Wazuh configuration.
Step 2: Install TheHive Python Module on Wazuh
TheHive integration uses a Python library called thehive4py to send alerts. We need to install it inside Wazuh’s built-in Python environment. Run this command on your Wazuh Manager:
sudo /var/ossec/framework/python/bin/pip3 install thehive4py==1.8.1
Step 3: Create the Custom Integration Script
Wazuh needs a special script to format alerts and send them to TheHive.
- Creating the Python Script
sudo nano /var/ossec/integrations/custom-w2thive.py
Paste the below script into the python file
#!/var/ossec/framework/python/bin/python3
import json
import sys
import os
import re
import logging
import uuid
from thehive4py.api import TheHiveApi
from thehive4py.models import Alert, AlertArtifact

#start user config

# Global vars

#threshold for wazuh rules level
lvl_threshold=0
#threshold for suricata rules level
suricata_lvl_threshold=3

debug_enabled = False
#info about created alert
info_enabled = True

#end user config

# Set paths
pwd = os.path.dirname(os.path.dirname(os.path.realpath(__file__)))
log_file = '{0}/logs/integrations.log'.format(pwd)
logger = logging.getLogger(__name__)
#set logging level
logger.setLevel(logging.WARNING)
if info_enabled:
    logger.setLevel(logging.INFO)
if debug_enabled:
    logger.setLevel(logging.DEBUG)
# create the logging file handler
fh = logging.FileHandler(log_file)
formatter = logging.Formatter('%(asctime)s - %(name)s - %(levelname)s - %(message)s')
fh.setFormatter(formatter)
logger.addHandler(fh)

def main(args):
    logger.debug('#start main')
    logger.debug('#get alert file location')
    alert_file_location = args[1]
    logger.debug('#get TheHive url')
    thive = args[3]
    logger.debug('#get TheHive api key')
    thive_api_key = args[2]
    thive_api = TheHiveApi(thive, thive_api_key )
    logger.debug('#open alert file')
    w_alert = json.load(open(alert_file_location))
    logger.debug('#alert data')
    logger.debug(str(w_alert))
    logger.debug('#gen json to dot-key-text')
    alt = pr(w_alert,'',[])
    logger.debug('#formatting description')
    format_alt = md_format(alt)
    logger.debug('#search artifacts')
    artifacts_dict = artifact_detect(format_alt)
    alert = generate_alert(format_alt, artifacts_dict, w_alert)
    logger.debug('#threshold filtering')
    if w_alert['rule']['groups']==['ids','suricata']:
        #checking the existence of the data.alert.severity field
        if 'data' in w_alert.keys():
            if 'alert' in w_alert['data']:
                #checking the level of the source event
                if int(w_alert['data']['alert']['severity'])<=suricata_lvl_threshold:
                    send_alert(alert, thive_api)
    elif int(w_alert['rule']['level'])>=lvl_threshold:
        #if the event is different from suricata AND suricata-event-type: alert check lvl_threshold
        send_alert(alert, thive_api)

def pr(data,prefix, alt):
    for key,value in data.items():
        if hasattr(value,'keys'):
            pr(value,prefix+'.'+str(key),alt=alt)
        else:
            alt.append((prefix+'.'+str(key)+'|||'+str(value)))
    return alt

def md_format(alt,format_alt=''):
    md_title_dict = {}
    #sorted with first key
    for now in alt:
        now = now[1:]
        #fix first key last symbol
        dot = now.split('|||')[0].find('.')
        if dot==-1:
            md_title_dict[now.split('|||')[0]] =[now]
        else:
            if now[0:dot] in md_title_dict.keys():
                (md_title_dict[now[0:dot]]).append(now)
            else:
                md_title_dict[now[0:dot]]=[now]
    for now in md_title_dict.keys():
        format_alt+='### '+now.capitalize()+'\n'+'| key | val |\n| ------ | ------ |\n'
        for let in md_title_dict[now]:
            key,val = let.split('|||')[0],let.split('|||')[1]
            format_alt+='| **' + key + '** | ' + val + ' |\n'
    return format_alt


def artifact_detect(format_alt):
    artifacts_dict = {}
    artifacts_dict['ip'] = re.findall(r'\d+\.\d+\.\d+\.\d+',format_alt)
    artifacts_dict['url'] =  re.findall(r'http[s]?://(?:[a-zA-Z]|[0-9]|[$-_@.&+]|[!*\(\),]|(?:%[0-9a-fA-F][0-9a-fA-F]))+',format_alt)
    artifacts_dict['domain'] = []
    for now in artifacts_dict['url']: artifacts_dict['domain'].append(now.split('//')[1].split('/')[0])
    return artifacts_dict

def generate_alert(format_alt, artifacts_dict,w_alert):
    #generate alert sourceRef
    sourceRef = str(uuid.uuid4())[0:6]
    artifacts = []
    if 'agent' in w_alert.keys():
        if 'ip' not in w_alert['agent'].keys():
            w_alert['agent']['ip']='no agent ip'
    else:
        w_alert['agent'] = {'id':'no agent id', 'name':'no agent name'}

    for key,value in artifacts_dict.items():
        for val in value:
            artifacts.append(AlertArtifact(dataType=key, data=val))
    alert = Alert(title=w_alert['rule']['description'],
              tlp=2,
              tags=['wazuh',
              'rule='+w_alert['rule']['id'],
              'agent_name='+w_alert['agent']['name'],
              'agent_id='+w_alert['agent']['id'],
              'agent_ip='+w_alert['agent']['ip'],],
              description=format_alt ,
              type='wazuh_alert',
              source='wazuh',
              sourceRef=sourceRef,
              artifacts=artifacts,)
    return alert

def send_alert(alert, thive_api):
    response = thive_api.create_alert(alert)
    if response.status_code == 201:
        logger.info('Create TheHive alert: '+ str(response.json()['id']))
    else:
        logger.error('Error create TheHive alert: {}/{}'.format(response.status_code, response.text))

if __name__ == "__main__":

    try:
       logger.debug('debug mode') # if debug enabled
       # Main function
       main(sys.argv)

    except Exception:
       logger.exception('EGOR')
This Python script acts as a connector between Wazuh and TheHive by automatically converting Wazuh alerts into TheHive alerts (cases) for investigation. When Wazuh generates an alert, the script parses the JSON alert file, extracts key information, and formats it into a readable description. It also detects potential observables like IPs, URLs, and domains, which are attached as artifacts. Based on severity thresholds, it decides whether the alert should be forwarded to TheHive. If it passes the filter, the script sends the alert to TheHive using its API, where it becomes available for analysts to investigate further. Logging is enabled to track each step and confirm whether alerts were successfully created.
-
Create the Bash Wrapper Script Wazuh runs integration scripts through small shell wrappers.
Create a file:
sudo nano /var/ossec/integrations/custom-w2thiveThe script that goes into this is below
#!/bin/sh
WPYTHON_BIN="framework/python/bin/python3"
SCRIPT_PATH_NAME="$0"
DIR_NAME="$(cd $(dirname ${SCRIPT_PATH_NAME}); pwd -P)"
SCRIPT_NAME="$(basename ${SCRIPT_PATH_NAME})"

case ${DIR_NAME} in
    */active-response/bin | */wodles*)
        if [ -z "${WAZUH_PATH}" ]; then
            WAZUH_PATH="$(cd ${DIR_NAME}/../..; pwd)"
        fi
    PYTHON_SCRIPT="${DIR_NAME}/${SCRIPT_NAME}.py"
    ;;
    */bin)
        if [ -z "${WAZUH_PATH}" ]; then
            WAZUH_PATH="$(cd ${DIR_NAME}/..; pwd)"
        fi
    PYTHON_SCRIPT="${WAZUH_PATH}/framework/scripts/${SCRIPT_NAME}.py"
    ;;
    */integrations)
        if [ -z "${WAZUH_PATH}" ]; then
            WAZUH_PATH="$(cd ${DIR_NAME}/..; pwd)"
        fi
    PYTHON_SCRIPT="${DIR_NAME}/${SCRIPT_NAME}.py"
    ;;
esac

${WAZUH_PATH}/${WPYTHON_BIN} ${PYTHON_SCRIPT} $@
This small shell wrapper is what allows Wazuh to execute your custom Python integration reliably. Since Wazuh can call integrations from different directories, the wrapper first checks its own location, then calculates the correct base path to Wazuh and to the Python script it needs to run. It then builds the path to your custom-w2thive.py script and finally uses Wazuh’s bundled Python interpreter (framework/python/bin/python3) to execute it, passing along any arguments that Wazuh supplies. In simple terms, the wrapper acts as a bridge: Wazuh calls the wrapper, the wrapper resolves the right paths, and then your Python script runs to forward alerts into TheHive. This ensures the integration works consistently regardless of where Wazuh launches it from.
Step 4: Set Permissions
These scripts must be executable and owned by the correct group (ossec in Wazuh).
sudo chmod 755 /var/ossec/integrations/custom-w2thive.py
sudo chmod 755 /var/ossec/integrations/custom-w2thive
sudo chown root:ossec /var/ossec/integrations/custom-w2thive.py
sudo chown root:ossec /var/ossec/integrations/custom-w2thive
These commands are making sure that both your wrapper (custom-w2thive) and the Python script (custom-w2thive.py) have the right permissions and ownership so Wazuh can execute them safely. By setting the mode to 755, you’re allowing the owner (root) to read, write, and execute, while members of the group and others can only read and execute. The ownership is set to root:ossec, which means the root user owns the files, but the ossec group also has access. This is important because Wazuh services run under the ossec group, so without this step, Wazuh would not be able to call your integration scripts.
Step 5: Configure Wazuh to Use the Integration
Edit the Wazuh Manager config file:
sudo nano /var/ossec/etc/ossec.conf
Add this inside "ossec_config":
<integration>
    <name>custom-w2thive</name>
    <hook_url>http://THEHIVE_SERVER_IP:9000</hook_url>
    <api_key>YOUR_API_KEY</api_key>
    <alert_format>json</alert_format>
</integration>
THEHIVE_SERVER_IP = IP address of your TheHive server (e.g., 127.0.0.1 if on the same machine). YOUR_API_KEY = the key you copied earlier
Step 6: Restart Wazuh
sudo systemctl restart wazuh-manager
Step 7: Test the Integration
We’ll create fake alerts to see if they appear in TheHive. Example: Trigger a Syscheck alert by creating a file in /etc:
sudo touch /etc/wazuh_test.txt
echo "test" | sudo tee -a /etc/wazuh_test.txt
Example: Trigger an authentication failure alert:
(Type any password - it will fail and create an alert.)
If everything works, you’ll see messages in:
sudo tail -n 50 /var/ossec/logs/integrations.log
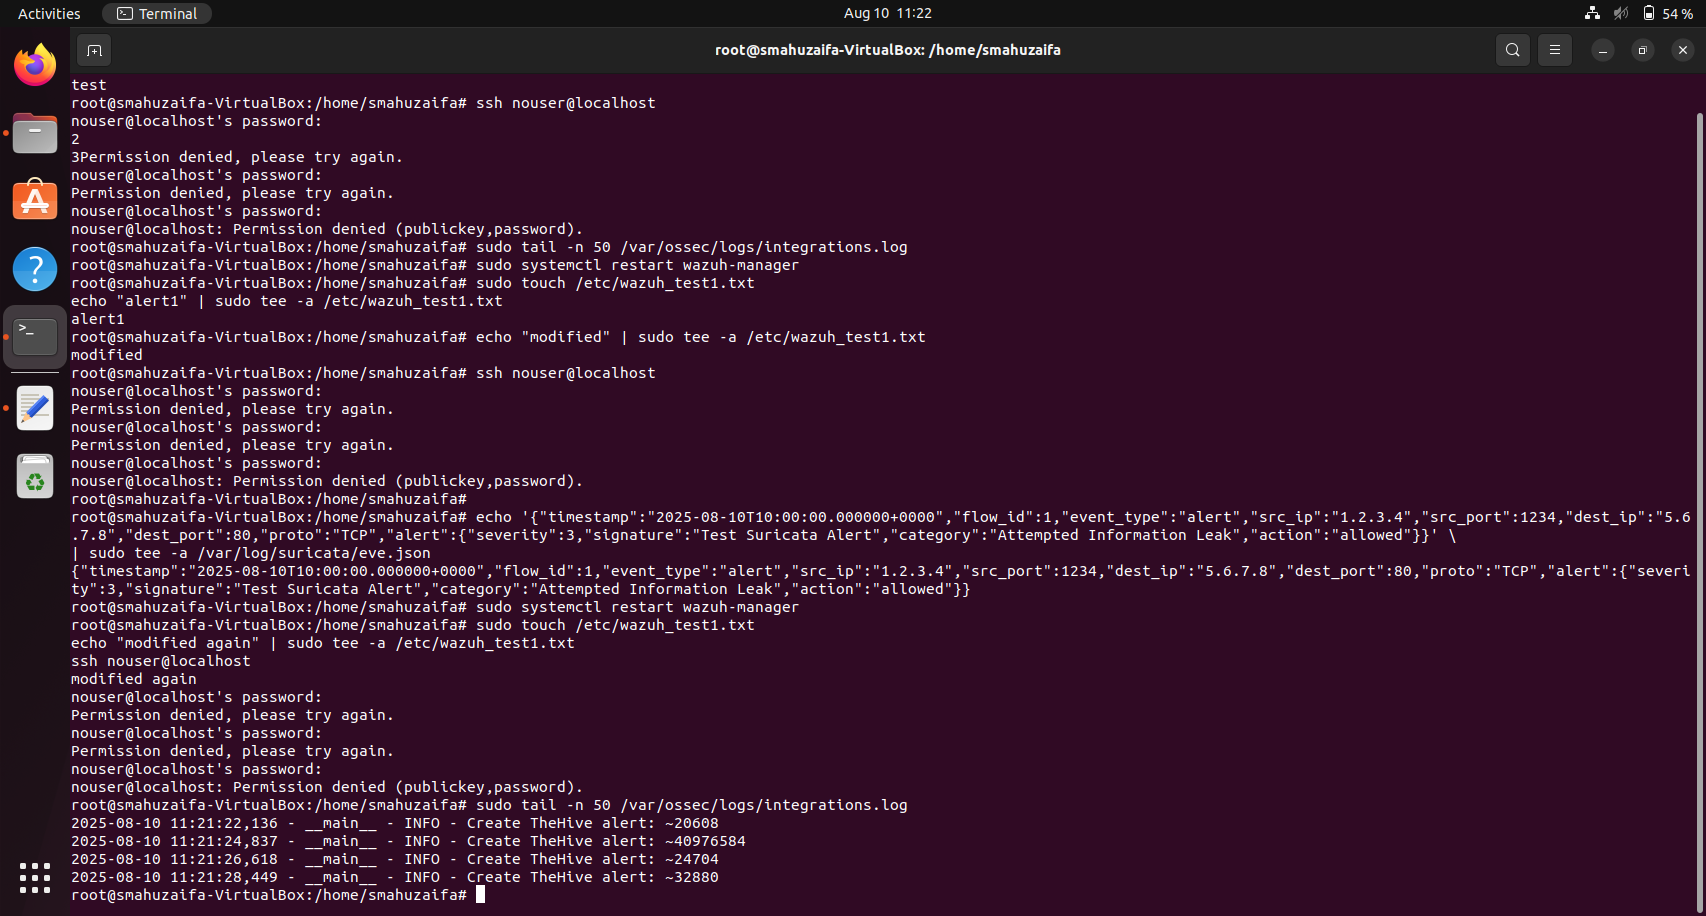
Automatically, the cases are created as shown below

Highlights of The Hive
-
Integration ensures Wazuh alerts are automatically forwarded to TheHive as cases.
-
Removes manual work of copying alerts, giving analysts a single central platform.
-
Alerts are enriched with artifacts (IPs, URLs, domains) for immediate investigation.
-
Permissions and API keys ensure secure communication between Wazuh and TheHive.
-
Logging confirms whether alerts are created successfully, helping with troubleshooting.
-
Sets the foundation for advanced automation in future phases (e.g., Cortex enrichment).
Conclusion
This phase represents a major milestone in building an automated security operations pipeline, as it bridges the gap between detection and investigation. With the Wazuh ↔ TheHive integration in place, alerts no longer remain siloed within Wazuh but are automatically forwarded into TheHive, where they are transformed into actionable cases. This ensures that analysts can immediately work on verified incidents within a centralized platform rather than wasting time manually transferring data. In practice, this reduces friction, accelerates the response process, and makes sure that no critical alerts are overlooked due to human error or delays.
Beyond convenience, the integration adds structure and scalability to incident management. By feeding enriched alerts into TheHive, security teams can leverage case workflows, collaborative features, and task assignments that are built into TheHive’s design. This allows multiple analysts to coordinate effectively on the same incident, track progress, and document findings in one place. It also improves accountability, since every case in TheHive is linked to its originating Wazuh alert, creating an auditable chain of events.
From a strategic perspective, this integration lays the groundwork for more advanced automation in later phases, such as linking with Cortex for automated analysis, enriching cases with external threat intelligence, or triggering response actions directly from TheHive. What begins here as a simple alert forwarding mechanism evolves into the foundation of a full Security Orchestration, Automation, and Response (SOAR) pipeline. In other words, Phase 7 does not just close the loop between detection and investigation - it transforms the security workflow into a proactive, scalable, and collaborative system that strengthens the organization’s overall security posture.
What Else Can Be Done in TheHive
-
Case Management: Create, assign, and track incident cases with built-in workflows.
-
Collaboration: Multiple analysts can work together on the same case with shared notes and tasks.
-
Observables & Enrichment: Add observables (IP, domain, hash) and run Cortex analyzers for automated enrichment.
-
Dashboards & Metrics: Visualize incident trends, case distribution, and response times.
-
Custom Workflows: Define templates, tags, and response playbooks for consistency.
-
API & Automation: Extend TheHive with scripts, connectors, and integrations with other tools.
-
Audit & Accountability: Maintain a clear record of who did what and when for compliance.