Last updated by: RichardWhellum, Last updated on: 09/05/2025
The Virtual Machine (VM)
Document Creation: 22 September, 2024. Last Edited: 29 April, 2025. Authors: kghdxx, Jesse Rees, nouri-devv.
Document Code: ONB2. Effective Date: 22 September 2024. Expiry Date: 29 April 2026.
The virtual machine is a Deakin server located on Deakin campus and owned by the Deakin I.T team. it is an on-premises bare-metal storage device and is therefore cloud incapable.
The VM uses a Linux operating system and therefore has some differences to consider compared to Windows or Mac.
At the time of writing the virtual machine has a 1TB total capacity.
There are a few documents in the Data Warehouse documentation repository that recount the steps to access the virtual machine in more detail however below is a short quick-start explanation.
Here are a few basic steps to begin accessing the VM:
-
Account If you don't already have access: please request it from the Data Warehouse leader or mentor as soon as practical.
-
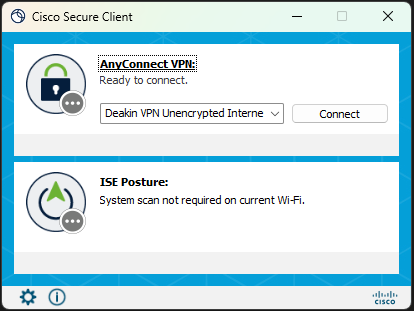
Connecting to the Deakin VPN The next part of accessing the Data Warehouse is connecting to Deakin's network which requires downloading and connecting to the Deakin Cisco AnyConnect VPN and authenticating, using Cisco Secure Client
There are two recommended ways to access the virtual machine.
Method 1. Using Command prompt.
You can use command prompt to access the VM
- Open command prompt from the start menu
- Use the command in the terminal
ssh yourusername@redback.it.deakin.edu.au - Enter your password.
- Use the terminal commands to navigate the VM
Method 2. Using VS Code IDE
Using an IDE makes accessing and navigating the VM easier with the additional user interface instead of relaying code in CMD prompt.
- Open VS code
- Click on open remote in the bottom left corner open remote picture
- '+' add New SSH host...
- Enter 'redback.it.deakin.edu.au'
- Enter password for your VM user
- You will see the redback ip in the bottom left-hand corner confirming your entry into the VM
- From here, it's recommended that you create your own folder to operate in the VM where you can then clone the data-warehouse GitHub repository and utilize the git functionality from the virtual machine as if it were an IDE on your PC. This is highly recommended and elaborated on later in the document.
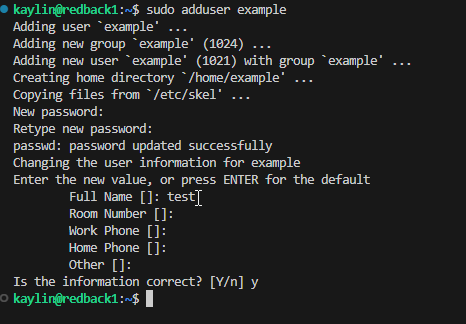
Adding a new user to the Virtual Machine
Adding a new user is a common occurrence and once you have sudo/admin privileges the process is straightforward.
-
Use the
sudo adduser <username> -
Give the user a password
-
Confirm details
Ensure to write down the credentials and send them through an appropriate means.
The user will now have access to the VM providing they follow the steps and authenticate through the VPN first as well.
List of Data Warehouse Addresses
Virtual Machine Address : 10.137.0.149
File upload service (streamlit app):http://10.137.0.149:80/
MinIO: http://10.137.0.149:9001/login
Dremio: http://10.137.0.149:9047/
MongoDB: http://10.137.0.149:5003/documents
Spark Notebooks: http://10.137.0.149:8888/
Flask-API: http://10.137.0.149:5000/
*The virtual machine also shares some capacity with the cybersecurity team including ports and containers not covered here.
The VM and Docker
⚠️ WARNING: Changes made to the Docker containers inside the VM affect the shared production environment. These containers are NOT isolated per user.
The VM uses a Docker instance to run 'containers' or apps (different software we use as tools e.g. MongoDB).
This makes it easier to keep track of what's running on the virtual machine, the apps dependencies and how it is interacting with the other apps in the Docker environment.
Accessing the Docker instance and containers is done through a terminal.
The Docker commands are beneficial because they are in the context of the Docker environment/instance and the containers/apps within it making them easier to control and modify.
Here are some of the commonly used commands:
docker ps Show all the docker containers and their status in the VM.
docker up Restarts the containers in the Docker environment.
docker start Usually followed by the container ID or name of the app.
docker compose usually followed by the dockerfile that contains a list of containers.
To run the docker compose which starts the core infrastructure (everything besides mongo db) the command done in the "Core DW Infrastructure" directory is:
docker compose up -d
There is a lot of documentation freely available for using docker on a Linux VM for more detailed information.
Removing, stopping and restarting Docker
It is important to note that stopping docker containers individually or as a collective will remove data associated with the container.
For instance, if I need to stop or restart the Dremio container and I have data within the Dremio container (SQL scripts, source information, usernames and admin information) this will remove this associated information unless there is a 'volume' consideration in the docker file. In the case of the core infrastructure there are volumes set up to capture information in the event of a restart or stop of the container.
Below is an extract from the docker-compose.yml. This serves as an example of using volumes to retain data.
(at the Dremio container code block)

dremio:

volumes:

- fileuploadservice_dremio-data:/var/lib/dremio


(at the 'volumes' code block)

volumes:

fileuploadservice_dremio-data:

external: true