Last updated by: SassafrasAU, Last updated on: 01/09/2024
Crowd Monitoring Overview
The Project Orion aims to apply cutting-edge AI technology to enhance crowd monitoring at various levels. In this semester, we are building on previous efforts to develop an intelligent tracking system, moving from IoT approach to application approach. Our main goal is create a cloud-based computer vision pipeline for improved efficiency and faster processing. Later, the application can connect to a database platform and fetching real-time data.
YOLOv8
Computer Vision (CV) is used in traffic anlysis, automation of manufacturing processed,and human monitoring, which is the essential aspect that we are focusing this semester.
YOLOv8 is a state of the art to monitor and track people in real-time. By combine that with Supervision library, we can detect and track people.
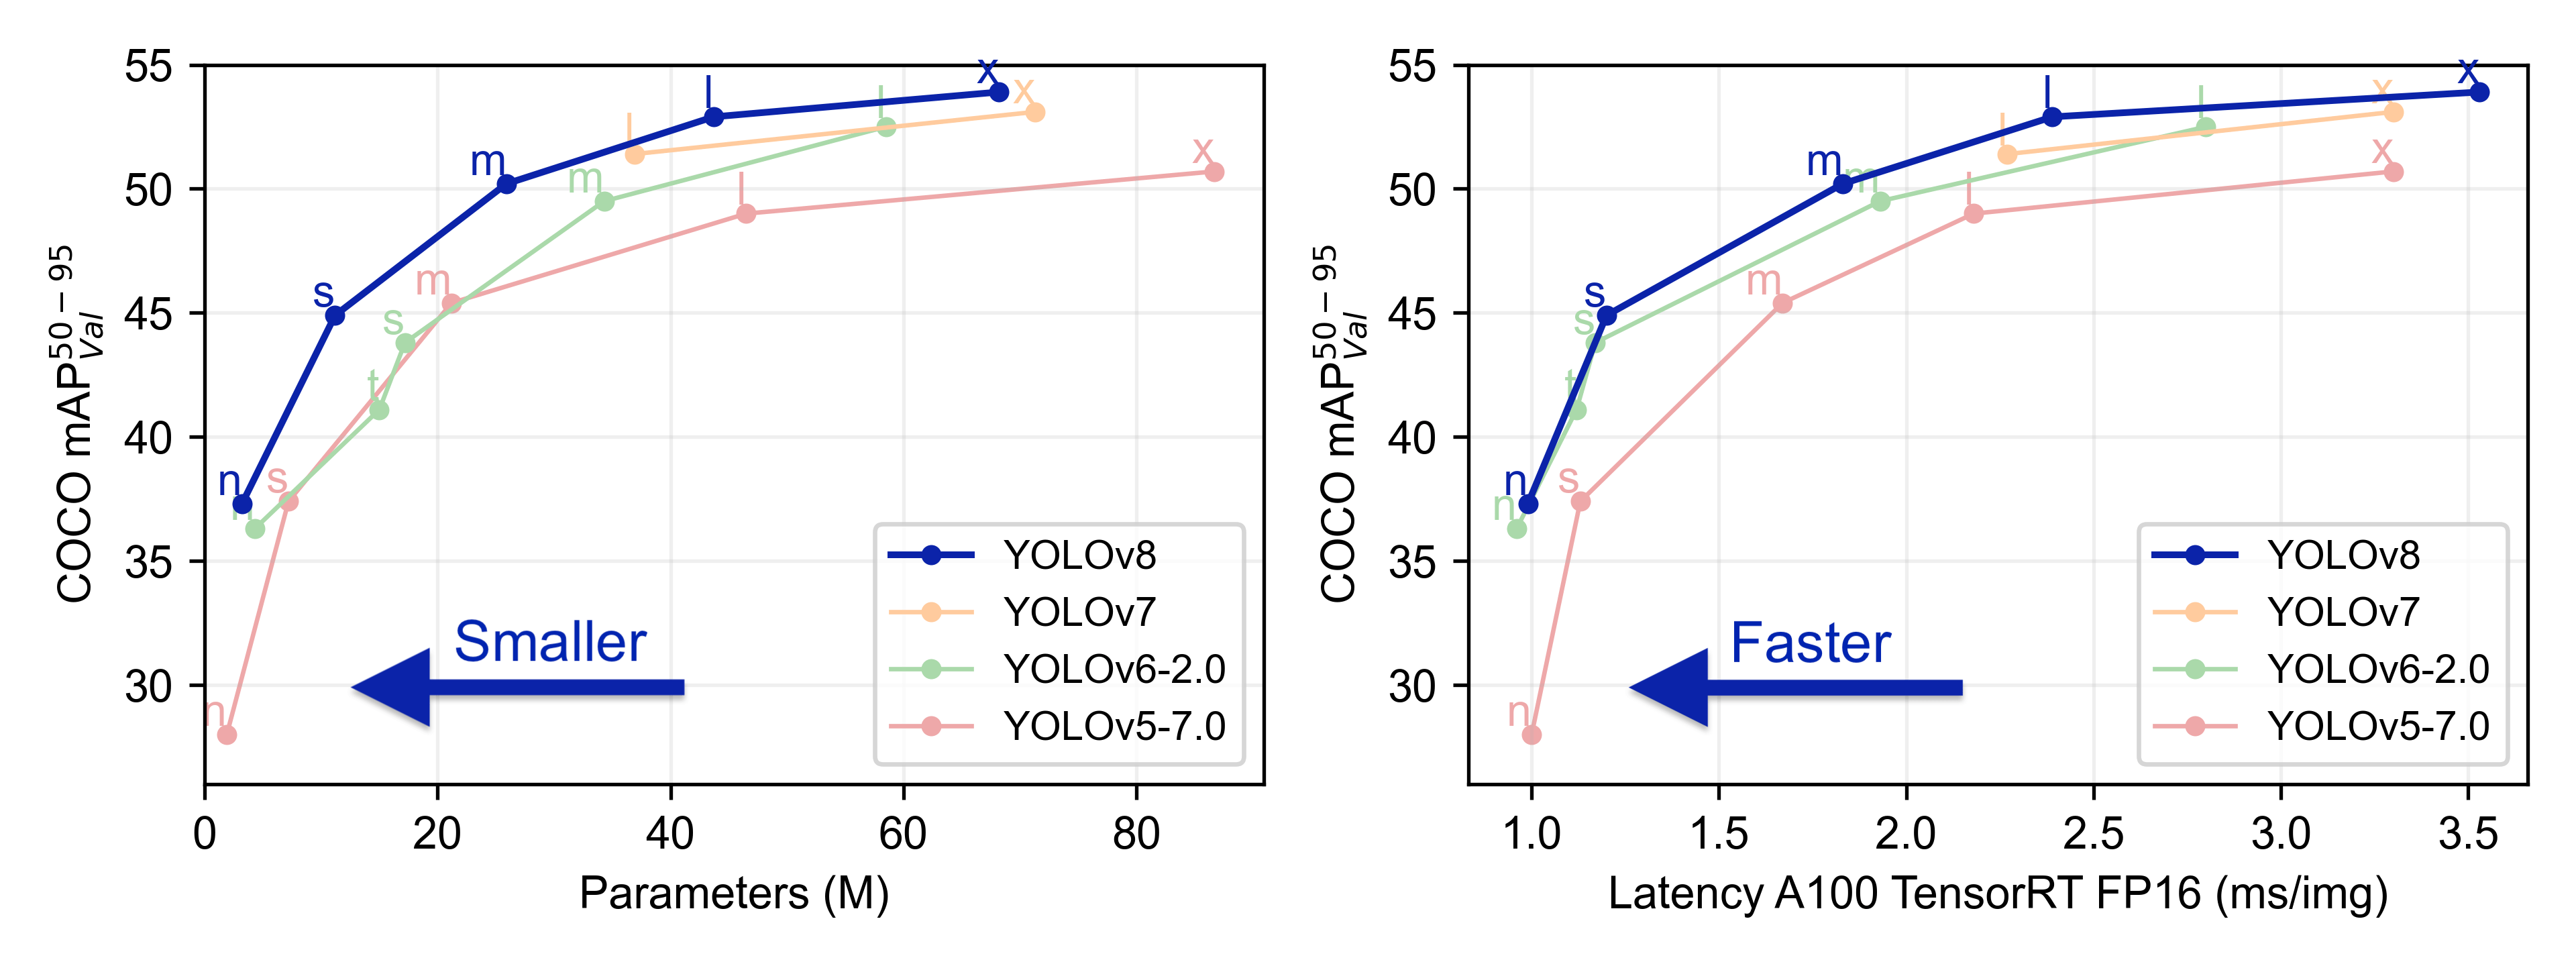 Source: https://docs.ultralytics.com/models/yolov8/
Blue print
We are focusing to build a pipeline for real-time camera process.
CCTV >> YOLOv8 >> MongoDB >> Website/Dashboard
Initialize libraries
This tells you the versions of both PyTorch and CUDA that are installed for Environment setup:
python
import torch
!nvcc --version
TORCH_VERSION = ".".join(torch.__version__.split(".")[:2])
CUDA_VERSION = torch.__version__.split("+")[-1]
print("torch: ", TORCH_VERSION, "; cuda: ", CUDA_VERSION)
We will use YOLOv8 in this project:
python
!pip install ultralytics

from IPython import display
display.clear_output()

import ultralytics
ultralytics.checks()
Supervision library:
python
!pip install supervision==0.2.0

from IPython import display
display.clear_output()

import supervision as sv
print("supervision", sv.__version__)
python
import os
HOME = os.getcwd()
print(HOME)
Testing Crowd Monitoring
We will use video from Supervision assets - PEOPLE_WALKING
https://media.roboflow.com/supervision/video-examples/people-walking.mp4
After downloaded, you will need to import into to your directory if using on Google Colab.
Video testing with YOLOv8 model
python
# Importing Libraries
from ultralytics import YOLO, solutions
from ultralytics.solutions import object_counter
import cv2
import os
import numpy as np
from IPython.display import display, Image

# Define the video path - Use your own path
MARKET_SQUARE_VIDEO_PATH = "/content/people-walking.mp4"

# Open the video file
cap = cv2.VideoCapture(MARKET_SQUARE_VIDEO_PATH)
assert cap.isOpened(), "Error reading video file"

# Load the YOLO model
model = YOLO("yolov8n.pt")

# Verify the output directory and permissions
output_dir = "/content"
if not os.path.exists(output_dir):
    os.makedirs(output_dir)

if not os.access(output_dir, os.W_OK):
    raise PermissionError(f"Write permission denied for the directory {output_dir}")

# Define the output video path
output_path = os.path.join(output_dir, "Peoplewalking_v8_29July.mp4")

# Reading the Video
w, h, fps = (int(cap.get(x)) for x in (cv2.CAP_PROP_FRAME_WIDTH, cv2.CAP_PROP_FRAME_HEIGHT, cv2.CAP_PROP_FPS))

# Initialize VideoWriter with a successful FourCC code
fourcc_code = cv2.VideoWriter_fourcc(*"mp4v")
video_writer = cv2.VideoWriter(output_path, fourcc_code, fps, (w, h))
if not video_writer.isOpened():
    raise IOError(f"Error initializing video writer with path {output_path}")

# Assigning the points for Region of Interest
region_points = [(20, 1000), (1080, 1000), (1080, 2000), (20, 2000)]

# Initialize the ObjectCounter with the model's class names
counter = solutions.ObjectCounter(
    view_img=True,
    reg_pts=region_points,
    names=model.names,
    draw_tracks=True,
    line_thickness=2,
)

while cap.isOpened():
    success, im0 = cap.read()
    if not success:
        print("Video frame is empty or video processing has been successfully completed.")
        break
    tracks = model.track(im0, persist=True, show=False, imgsz=1280)

    im0 = counter.start_counting(im0, tracks)
    video_writer.write(im0)

cap.release()

video_writer.release()
cv2.destroyAllWindows()
print(f"Processed video saved to {output_path}")
We have two methods with Camera integration:
- RTSP url - high latency
- Virtue Camera - Camo Studio app - low latency
RTSP Camera testing with YOLOv8
Camera testing with YOLOv8
python
!pip install opencv-python numpy ultralytics Flask
python
!pip install "pymongo[srv]"
python
from flask import Flask, Response
import cv2
import numpy as np
from ultralytics import YOLO
from pymongo import MongoClient
from datetime import datetime, date
import time
from dotenv import load_dotenv
import os


# Load YOLO model
model = YOLO('yolov8n.pt')  # or use a different YOLO version

# RTSP stream URL
# Retrive the RTSP stream URL from iSpy or Wireshark
# Replace the rtsp_url with your own RTSP stream URL
rtsp_url = ''

# Connect to the RTSP stream
cap = cv2.VideoCapture(rtsp_url)

#MongoDB connection
client = MongoClient('')
db = client["CrowdTracking"]
collection = db["Crowd"]

#variables for frame_id and date format
frame_id = 0
current_date = date.today()
update_interval = 1 # Update interval in seconds
last_update_time = 0

while True:
        current_time = time.time()
        # Read the frame from the stream
        # If the frame was not read, then break the loop and print an error
        ret, frame = cap.read()
        if not ret:
            print('Error reading the frame')
            break

        # Perform YOLO detection
        results = model(frame)

        # Process results with box coordinates and confidence scores
        for result in results:
            boxes = result.boxes.cpu().numpy()
            for box in boxes:
                x1, y1, x2, y2 = map(int, box.xyxy[0])
                conf = box.conf[0]
                cls = int(box.cls[0])

                if cls == 0:  # Assuming class 0 is person
                    cv2.rectangle(frame, (x1, y1), (x2, y2), (0, 255, 0), 2)
                    cv2.putText(frame, f'Person: {conf:.2f}', (x1, y1 - 10),
                            cv2.FONT_HERSHEY_SIMPLEX, 0.5, (0, 255, 0), 2)

        # This update allows to save the number of persons detected to MongoDB
        # for every update_interval seconds
        if current_time - last_update_time < update_interval:
            now = datetime.now()
            # Save the number of persons detected to MongoDB
            # Save the frame_id, timestamp and the total number of persons detected
            data = {

                "frame_id": frame_id,
                "timestamp": now.strftime("%d/%m/%Y %H:%M:%S"),
                "total_persons": len(boxes)
            }
            collection.insert_one(data)
            last_update_time = current_time

        # Display the number of persons detected on the frame
        cv2.rectangle(frame, (10, 10), (310, 60), (255, 255, 255), -1)
        cv2.putText(frame, f'Total Persons: {len(boxes)}', (20, 40),
                cv2.FONT_HERSHEY_SIMPLEX, 1, (0, 0, 0), 2)

        frame_id += 1

        # Display the frame
        cv2.imshow('Crowd Detection', frame)
        if cv2.waitKey(1) & 0xFF == ord('q'):
            break

cap.release()
cv2.destroyAllWindows()
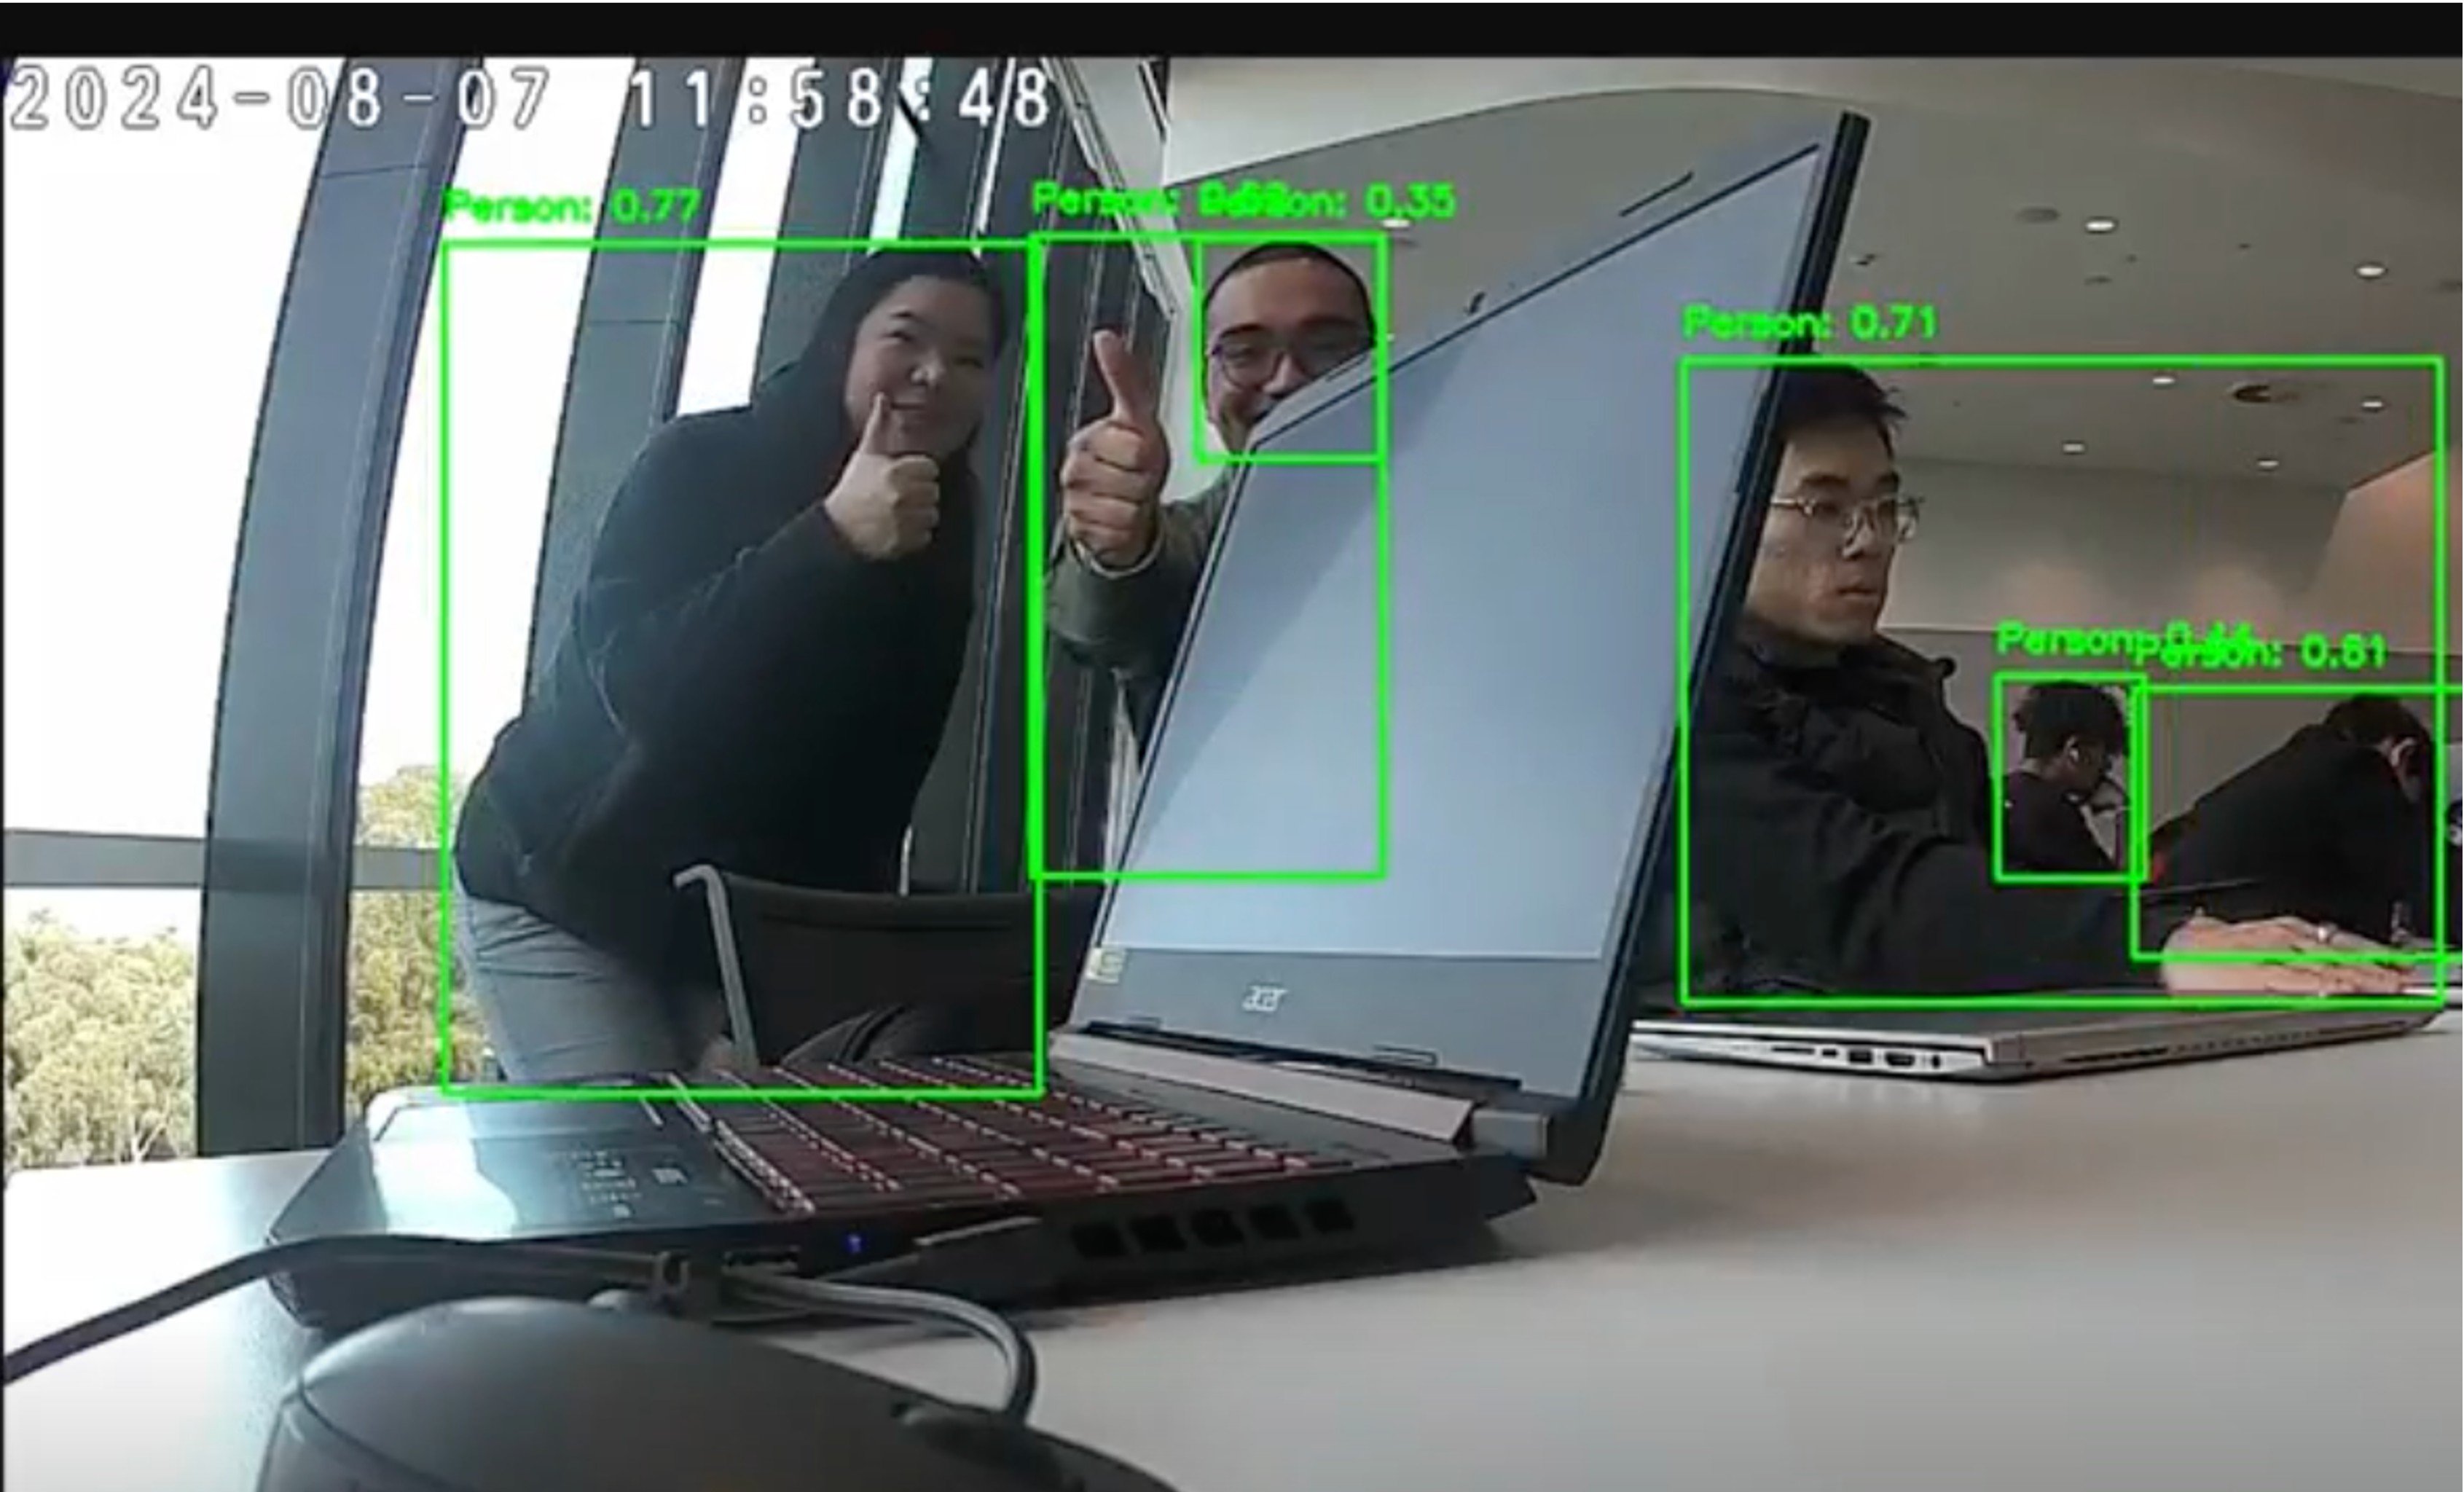
Result
Load YOLO model
model = YOLO('yolov8n.pt')  # or use a different YOLO version

# RTSP stream URL
# Retrive the RTSP stream URL from iSpy or Wireshark
# Replace the rtsp_url with your own RTSP stream URL
rtsp_url = ''

# Connect to the RTSP stream
cap = cv2.VideoCapture(rtsp_url)

#MongoDB connection
client = MongoClient('')
db = client["CrowdTracking"]
collection = db["Crowd"]

#variables for frame_id and date format
frame_id = 0
current_date = date.today()
update_interval = 1 # Update interval in seconds
last_update_time = 0

while True:
        current_time = time.time()
        # Read the frame from the stream
        # If the frame was not read, then break the loop and print an error
        ret, frame = cap.read()
        if not ret:
            print('Error reading the frame')
            break

        # Perform YOLO detection
        results = model(frame)

        # Process results with box coordinates and confidence scores
        for result in results:
            boxes = result.boxes.cpu().numpy()
            for box in boxes:
                x1, y1, x2, y2 = map(int, box.xyxy[0])
                conf = box.conf[0]
                cls = int(box.cls[0])

                if cls == 0:  # Assuming class 0 is person
                    cv2.rectangle(frame, (x1, y1), (x2, y2), (0, 255, 0), 2)
                    cv2.putText(frame, f'Person: {conf:.2f}', (x1, y1 - 10),
                            cv2.FONT_HERSHEY_SIMPLEX, 0.5, (0, 255, 0), 2)

        # This update allows to save the number of persons detected to MongoDB
        # for every update_interval seconds
        if current_time - last_update_time < update_interval:
            now = datetime.now()
            # Save the number of persons detected to MongoDB
            # Save the frame_id, timestamp and the total number of persons detected
            data = {

                "frame_id": frame_id,
                "timestamp": now.strftime("%d/%m/%Y %H:%M:%S"),
                "total_persons": len(boxes)
            }
            collection.insert_one(data)
            last_update_time = current_time

        # Display the number of persons detected on the frame
        cv2.rectangle(frame, (10, 10), (310, 60), (255, 255, 255), -1)
        cv2.putText(frame, f'Total Persons: {len(boxes)}', (20, 40),
                cv2.FONT_HERSHEY_SIMPLEX, 1, (0, 0, 0), 2)

        frame_id += 1

        # Display the frame
        cv2.imshow('Crowd Detection', frame)
        if cv2.waitKey(1) & 0xFF == ord('q'):
            break

cap.release()
cv2.destroyAllWindows()
Result
Camo Studio - Virtue Camera on Yolov8
We will use Camo Studio app. We will need to download it on your mobile device and PC via App store/Google Play. After setup the app via QR code, we can now use our mobile device as a virtue camera for VS Code.
python
import cv2
import numpy as np
from ultralytics import YOLO
from collections import defaultdict
from utils import calculateHomography, transformPoints
from pymongo import MongoClient
import time as time_module
from datetime import datetime
# Load the YOLO model
model = YOLO("yolov8n.pt")

# Connect to the MongoDB database
# and set up data recording
client = MongoClient("")
db = client["Crowd_Monitoring"]
collection = db["Crowd_Count"]

lastRecorded = time_module.time()
# Connect to the virtue camera using code "1". Code "0" for webcam
rtspUrl = 1
cap = cv2.VideoCapture(rtspUrl)

trackHistory = defaultdict(list)

# Load the floor image
from floorReplica import floorReplica
canvasHeight = 1000
canvasWidth = 700
tilesX = 25
tilesY = 15
floorImage = floorReplica(canvasHeight, canvasWidth, tilesX, tilesY, rtspUrl)

height, width, channels = floorImage.shape

# Define the codec and create a VideoWriter object
fourcc = cv2.VideoWriter_fourcc(*'mp4v')
video = cv2.VideoWriter('output.mp4', fourcc, 20.0, (width, height))

# Define the source and destination points for the homography matrix
# Calculate the homography matrix
ptsSRC = np.array([[28, 1158], [2120, 1112], [1840, 488], [350, 518], [468, 1144]])
ptsDST = np.array([[0, 990], [699, 988], [693, 658], [0, 661], [141, 988]])
homographyMatrix = calculateHomography(ptsSRC, ptsDST)

# Main loop
while True:
#while cap.isOpened():
    success, frame = cap.read()
    results = model.track(frame, persist=True, show=False, imgsz=1280, verbose=True)
    annotatedFrame = floorImage.copy()

    # Process camera results with box coordinates and confidence scores
    for result in results:
            boxes_camera = result.boxes.cpu().numpy()
            for box in boxes_camera:
                x1, y1, x2, y2 = map(int, box.xyxy[0])
                conf = box.conf[0]
                cls = int(box.cls[0])

                if cls == 0:  # Assuming class 0 is person
                    cv2.rectangle(frame, (x1, y1), (x2, y2), (0, 255, 0), 2)
                    cv2.putText(frame, f'Person: {conf:.2f}', (x1, y1 - 10),
                            cv2.FONT_HERSHEY_SIMPLEX, 0.5, (0, 255, 0), 2)


    # if results[0].boxes is not None and hasattr(results[0].boxes, 'id'):
    try:
        if results[0].boxes is not None:
            # Check if the boxes attribute contains IDs
            if hasattr(results[0].boxes, 'id'):
                # Check if there are any detected boxes
                if results[0].boxes.id.numel() > 0:
                    # Convert tensor to NumPy array
                    boxes = results[0].boxes.xywh.cpu().numpy()
                    trackIDs = results[0].boxes.id.cpu().numpy()
                    print('Track IDs:', trackIDs)
                    # Copy floorImage only if objects are detected
                    annotatedFrame = floorImage.copy()

                    for trackID in np.unique(trackIDs):
                        history = trackHistory[trackID]
                        if len(history) > 1:
                            points = np.array(history, dtype=np.int32)
                            newPoints = transformPoints(points, homographyMatrix)
                            newPoints = newPoints.astype(np.int32)

                            cv2.polylines(annotatedFrame, [newPoints], isClosed=False, color=(0, 0, 255), thickness=2)

                    for box, trackID in zip(boxes, trackIDs):
                        x, y, w, h = box
                        center = (int(x), int(y + h / 2))
                        trackHistory[trackID].append(center)

                        if len(trackHistory[trackID]) > 50:
                            trackHistory[trackID].pop(0)
                    currentTime = time_module.time()
                    print(currentTime)
                    # Record the number of people in the frame every second
                    if currentTime - lastRecorded > 1:
                        frameId = int(cap.get(cv2.CAP_PROP_POS_FRAMES))
                        totalPeople = len(np.unique(trackIDs))
                        print("People", totalPeople)
                        # Convert current time to human-readable format
                        timestamp = time_module.strftime("%d-%m-%Y %H:%M:%S", time_module.localtime(currentTime))
                        print(timestamp)
                        record = {
                                "frameId": frameId,
                                "timestamp": timestamp,
                                "totalPeople": totalPeople
                            }

                        print("Before inserting record into MongoDB")

                        collection.insert_one(record)
                        print("After inserting record into MongoDB")
                        lastRecorded = currentTime
                    print("People 2", totalPeople)
                    video.write(annotatedFrame)
                else:
                        print("No objects detected. No IDs available.")
            else:
                print("The 'id' attribute is not present in the boxes.")
        else:
                print("No boxes detected. The 'boxes' attribute is None.")
    except AttributeError as e:
                print(f"An AttributeError occurred: {e}")
    except Exception as e:
                print(f"An unexpected error occurred: {e}")

    cv2.imshow("Map Tracking", annotatedFrame)
    cv2.imshow("Camera Feed", frame)
    if cv2.waitKey(1) & 0xFF == ord('q'):
        break

cap.release()
cv2.destroyAllWindows()
Result
Visualization
We will need to visualize data to display and analysis on dashboard.
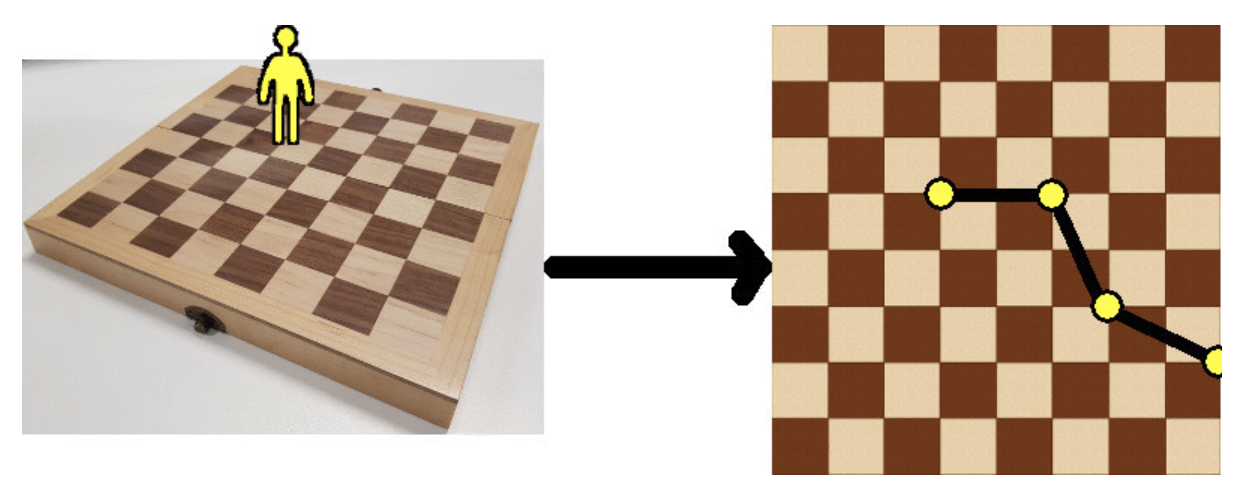
The idea is fetching the tracking path from processed data, plotting their points from camera footage onto 2D floor plan.
From that, we can do flow analysis and heatmap to evaluate crowd density.
This is a powerful information. It will allow you to easily recognize common pattern of congestion at particular times of day or places. Moreover, it can improve your business performance by arranging staffs and products, make inform decisions to drive sales.
Your security camera images are distorted. For example, a one pixel movement at the top of your image corresponds to a much larger movement in the real world than a one pixel movement at the bottom of your image.
Homography Transformation is the solution for camera mapping.
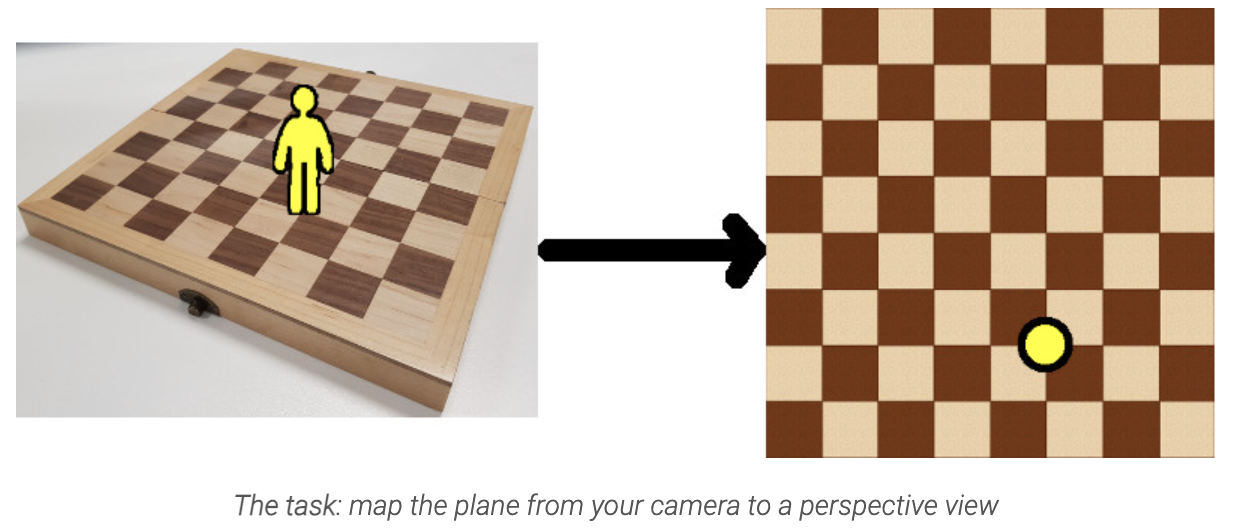
 Source: https://zbigatron.com/mapping-camera-coordinates-to-a-2d-floor-plan/
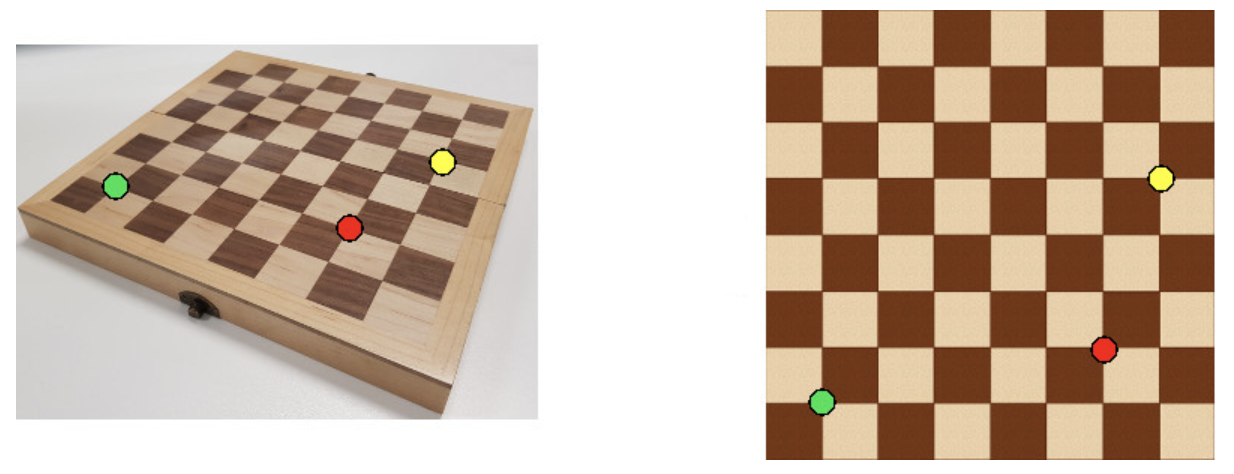
We need to calculate corresponse mapping matrix H for homography transformation. We can create the matrix by choosing pixel coordinates in camera view and corresponding pixel coordinates in matching image (at least 4 points).
Use matrix H to performed track points transformation to plot path on map 2D floor plane.
TESTING
Fetching and draw track path of camera view
python
import cv2
import numpy as np
from ultralytics import YOLO
from collections import defaultdict

# Initialize YOLO model
model = YOLO("yolov8n.pt")

# Open video file
video_path = "/content/people-walking.mp4"
cap = cv2.VideoCapture(video_path)

# Initialize track history
track_history = defaultdict(list)

# Initialize video writer (optional, if you want to save the output)
fourcc = cv2.VideoWriter_fourcc(*"mp4v")
video_writer = cv2.VideoWriter('/content/tracking_white_output.mp4', fourcc, 20.0, (int(cap.get(3)), int(cap.get(4))))

# Assigning the points for Region of Interest
region_points = [(20, 500), (1080, 500), (1080, 1000), (20, 1000)]

# Initialize the ObjectCounter with the model's class names
# Init Object Counter
counter = solutions.ObjectCounter(
    view_img=True,
    view_in_counts	= True,
    view_out_counts	= True,
    reg_pts=region_points,
    names=model.names,
    #draw_tracks=True,
    line_thickness=2,
)
while cap.isOpened():
    success, frame = cap.read()
    if not success:
        break
    # Get the frame dimensions
    height, width, channels = frame.shape

    # Create a white frame of the same size
    white_frame = np.ones((height, width, channels), dtype=np.uint8) * 255

    # Track objects in the frame
    results = model.track(frame, persist=True, show=False, imgsz=1280, verbose=True)


    # Extract tracking results
    boxes = results[0].boxes.xywh.cpu().numpy()
    track_ids = results[0].boxes.id.int().cpu().numpy()

    # Draw paths for each track
    #frame_with_counting = counter.start_counting(frame, results)
    #annotated_frame = frame_with_counting.copy()  # Make a copy of the frame to draw paths on
    annotated_frame = white_frame  # Make a copy of the frame to draw paths on
    for track_id in np.unique(track_ids):
        # Get the history for this track_id
        history = track_history[track_id]
        if len(history) > 1:
            points = np.array(history, dtype=np.int32)
            # Draw the path (line connecting the points)
            cv2.polylines(annotated_frame, [points], isClosed=False, color=(0, 255, 0), thickness=2)

    # Update the track history with new positions
    for box, track_id in zip(boxes, track_ids):
        x, y, w, h = box
        center = (int(x), int(y + h / 2))
        track_history[track_id].append(center)
        # Limit history length
        if len(track_history[track_id]) > 50:
            track_history[track_id].pop(0)

    # Save or display the frame
    video_writer.write(annotated_frame)


# Release resources
cap.release()
video_writer.release()
cv2.destroyAllWindows()
Draw floor plan
python
from google.colab.patches import cv2_imshow
import numpy as np

def create_floor_replica(canvas_height, canvas_width, num_tiles_x, num_tiles_y):
    """
    Create a floor replica with a white canvas and rectangular tiles.

    Parameters:
    canvas_height (int): Height of the canvas.
    canvas_width (int): Width of the canvas.
    num_tiles_x (int): Number of tiles horizontally.
    num_tiles_y (int): Number of tiles vertically.

    Returns:
    floor_image (numpy.ndarray): The generated floor image with tiles.
    """
    # Calculate the height of each tile
    tile_height = canvas_height // num_tiles_y
    # Calculate the width of each tile
    tile_width = canvas_width // num_tiles_x

    # Create a white canvas
    floor_image = np.ones((canvas_height, canvas_width, 3), dtype=np.uint8) * 255

    # Draw the tiles (rectangles)
    for y in range(0, canvas_height, tile_height):
        for x in range(0, canvas_width, tile_width):
            cv2.rectangle(floor_image, (x, y), (x + tile_width, y + tile_height), (0, 0, 0), 1)

    return floor_image

# Example usage
if __name__ == "__main__":
    # Define the canvas size (height and width)
    canvas_height = 1000  # Example height
    canvas_width = 700  # Example width

    # Number of tiles horizontally and vertically
    num_tiles_x = 25
    num_tiles_y = 15

    # Create the floor replica
    floor_image = create_floor_replica(canvas_height, canvas_width, num_tiles_x, num_tiles_y)

    # Display the result
    cv2_imshow(floor_image)
    cv2.imwrite('/content/floor_replica.png', floor_image)
    cv2.waitKey(0)
    cv2.destroyAllWindows()
Perform transformation and draw tracking path on floor plan
python
import cv2
import numpy as np
from ultralytics import YOLO
from collections import defaultdict

# Initialize YOLO model
model = YOLO("yolov8n.pt")

# Open video file
video_path = "/content/people-walking.mp4"
cap = cv2.VideoCapture(video_path)

# Initialize track history
track_history = defaultdict(list)

# Load the base image
base_image_path = '/content/floor_replica.png'
floor_frame = cv2.imread(base_image_path)

# Ensure the base image is loaded
if floor_frame is None:
    raise ValueError(f"Could not load the base image from {base_image_path}")

# Get the dimensions of the base image
height, width, channels = floor_frame.shape

# Initialize video writer with the dimensions of the base image
fourcc = cv2.VideoWriter_fourcc(*"mp4v")
video_writer = cv2.VideoWriter('/content/2D_map_output.mp4', fourcc, 20.0, (width, height))

# Matching points from 2 views
# Provide points from image 1
pts_src = np.array([[28, 1158], [2120, 1112], [1840, 488], [350, 518], [468, 1144]])
# Corresponding points from image 2
pts_dst = np.array([[0, 990], [699, 988], [693, 658], [0, 661], [141, 988]])

# Define homography functions
def calculate_homography(pts_src, pts_dst):
    return cv2.findHomography(pts_src, pts_dst)[0]

def transform_points(points, homography_matrix):
    points = np.concatenate([points, np.ones((points.shape[0], 1))], axis=1)  # Add a column of ones for homogenous coordinates
    transformed_points = homography_matrix.dot(points.T).T  # Apply homography
    transformed_points /= transformed_points[:, 2][:, np.newaxis]  # Normalize by the third coordinate
    return transformed_points[:, :2]

# Calculate the homography matrix once, since pts_src and pts_dst are constant
homography_matrix = calculate_homography(pts_src, pts_dst)

# Process each frame
while cap.isOpened():
    success, frame = cap.read()
    if not success:
        break

    # Track objects in the frame
    results = model.track(frame, persist=True, show=False, imgsz=1280, verbose=True)

    # Extract tracking results
    boxes = results[0].boxes.xywh.cpu().numpy()
    track_ids = results[0].boxes.id.int().cpu().numpy()

    # Use a fresh copy of the base image
    annotated_frame = floor_frame.copy()

    for track_id in np.unique(track_ids):
        # Get the history for this track_id
        history = track_history[track_id]
        if len(history) > 1:
            points = np.array(history, dtype=np.int32)
            # Transform the points using the precomputed homography matrix
            new_points = transform_points(points, homography_matrix)
            new_points = new_points.astype(np.int32)
            # Draw the path (line connecting the points)
            cv2.polylines(annotated_frame, [new_points], isClosed=False, color=(0, 255, 0), thickness=2)

    # Update the track history with new positions
    for box, track_id in zip(boxes, track_ids):
        x, y, w, h = box
        center = (int(x), int(y + h / 2))
        track_history[track_id].append(center)
        # Limit history length
        if len(track_history[track_id]) > 50:
            track_history[track_id].pop(0)

    # Save the annotated frame to the video
    video_writer.write(annotated_frame)

# Release resources
cap.release()
video_writer.release()
cv2.destroyAllWindows()
Results