Last updated by: Kaleb, Last updated on: 14/03/2024
Build a project on google compute engine VM by using Jenkins Google Compute Engine Plugin instruction manual
Research Piece
Author: jikuan
Abstract
The document aims to illustrate how to create an IAM service account on google cloud console, how to create a reusable Compute Engine image, how to install and configure Google Cloud Engine(GCE) plugin, and how to run a job(e.g., building a Redback frontend project) on an a Jenkins agent created automatically on google cloud.
Terminology:
an IAM service account is “a special kind of account used by an application or compute workload, such as a Compute Engine virtual machine (VM) instance, rather than a person” [1]. This account will be used to create a private key for Jenkins to access google cloud.
The Google Compute Engine (GCE) Plugin allows developers to use GCE virtual machines (VMs) with Jenkins to execute build tasks. GCE VMs provision quickly, are destroyed by Jenkins when idle, and therefore the VMs run at a much lower price than regular VMs [2].
Jenkins is an automation tool that helps in automating the various parts of the Software Development Life Cycle(SDLC) process [3]. The Google Compute Engine (GCE) Plugin is one of the numerous plugins Jenkins provide.
Packer is an open source tool for creating machine images. Here Packer is used to build a reusable Compute Engine image that contains the software and tools needed to run as a Jenkins executor [4].
Steps:
1. Create and configure an IAM service account
to create an IAM service account on the dashboard of google cloud, click “Activate Cloud Shell” on the top-right corner

set project sit-22t2-redback-infra-612f89e
input the following commands and enter:
gcloud iam service-accounts create jenkins --display-name jenkins
export SA_EMAIL=$(gcloud iam service-accounts list \
    --filter="displayName:jenkins" --format='value(email)')
export PROJECT=$(gcloud info --format='value(config.project)')
Bind the following roles to your service account. Remember that a ordinary account does not have such permissions to grant those roles to the account “jenkins”. Therefore, please ask the admin account owner(i.e., “scott.blackburn@deakin.edu.au”) to help execute those permissions:
gcloud projects add-iam-policy-binding $PROJECT \
    --role roles/storage.admin --member serviceAccount:$SA_EMAIL
gcloud projects add-iam-policy-binding $PROJECT --role roles/compute.instanceAdmin.v1 \
    --member serviceAccount:$SA_EMAIL
gcloud projects add-iam-policy-binding $PROJECT --role roles/compute.networkAdmin \
    --member serviceAccount:$SA_EMAIL
gcloud projects add-iam-policy-binding $PROJECT --role roles/compute.securityAdmin \
    --member serviceAccount:$SA_EMAIL
gcloud projects add-iam-policy-binding $PROJECT --role roles/iam.serviceAccountActor \
    --member serviceAccount:$SA_EMAIL
After successfully execute the above commands, execute the following command to create a private key used for Jenkins to get access to google cloud compute engine in the later steps:
gcloud iam service-accounts keys create jenkins-sa.json --iam-account $SA_EMAIL
In Cloud Shell, click “More”, and then click Download file. Type jenkins-sa.json. Click Download to save the file locally.
2. Create a Jenkins agent image on google cloud console
create a SSH key pair on google console. If one already exists, this command uses that key pair; otherwise, it creates a new one:
ls ~/.ssh/id_rsa.pub || ssh-keygen -N ""
Add the Cloud Shell public SSH key to your project's metadata:
    --format=json | jq -r '.commonInstanceMetadata.items[] | select(.key == "ssh-keys") | .value' > sshKeys.pub
echo "$USER:$(cat ~/.ssh/id_rsa.pub)" >> sshKeys.pub
gcloud compute project-info add-metadata --metadata-from-file ssh-keys=sshKeys.pub
download Packer software:
unzip packer_1.7.10_linux_amd64.zip
Create the configuration file for your Packer image builds:
cat > jenkins-agent.json <<EOF
{
  "builders": [
    {
      "type": "googlecompute",
      "project_id": "$PROJECT",
      "source_image_family": "ubuntu-2004-lts",
      "source_image_project_id": "ubuntu-os-cloud",
      "zone": "us-central1-a",
      "disk_size": "50",
      "image_name": "jenkins-agent-{{timestamp}}",
      "image_family": "jenkins-agent",
      "ssh_username": "ubuntu"
    }
  ],
  "provisioners": [
    {
      "type": "shell",
      "inline": ["sudo apt-get update && sudo apt-get install -y default-jdk"]
    }
  ]
}
EOF
Build the image by running Packer:
./packer build jenkins-agent.json
If the following prompt appears, it means the image is built successfully:
--> googlecompute: A disk image was created:
3. Onstall Google Cloud Engine(GCE) plugin
****In this section, we can use Cloud Marketplace to provision a Jenkins instance [4], or we can use our locally installed Jenkins. Here we use the locally installed Jenkins. However, for productional use, I recommend using a custom Jenkins instance VM provisioned by Cloud Marketplace, which costs some money.
To install Google Cloud Engine(GCE) plugin. First, we log on the Jenkins admin website. Then, in the Jenkins dashboard UI, select “Manage Jenkins” -> ”Manage Plugins”, Click the Available tab and use the Filter bar to find the following plugins and select the boxes next to them:
Compute Engine plugin
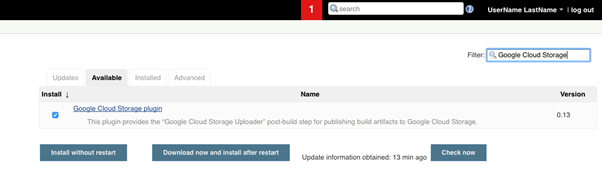
Click “Download now and install after restart” and then click the Restart Jenkins when installation is complete and no jobs are running checkbox [4]. Jenkins will restarts and completes the plugin installations [4].
4. Create plugin credentials
Log in to Jenkins again, and click Manage Jenkins -> Manage Credentials -> (global) -> “add credentials”:
- Set Kind to Google Service Account from private key.
- In the Project Name field, enter Google Cloud project ID(i.e., sit-22t2-redback-infra-612f89e).
- Click Choose file.
- Select the jenkins-sa.json file which was previously downloaded from Cloud console Shell.
- Click OK.
5. Configure Google Cloud Engine(GCE) plugin
- Click Manage Jenkins -> Manage Nodes and Clouds -> Configure Clouds
- Click Add a new Cloud, then click Google Compute Engine.
- Set the following settings and replace
[YOUR_PROJECT_ID]with your Google Cloud project ID:
Name: [YOUR_PROJECT_ID]
Project ID: [YOUR_PROJECT_ID]
Instance Cap: 8
- Choose the service account from the Service Account Credentials drop-down list. It is listed as your Google Cloud project ID [4].
- click Add under Instance Configurations.
- Enter the following General settings:
- Name-prefix:
gce - Description:
Ubuntu agent - Labels:
ubuntu-2004
- Name-prefix:
- Enter the following for Location settings:
- Region:
australia-southeast1 - Zone:
australia-southeast1-b
- Region:
- Click Advanced.
- For Machine Configuration, choose the Machine Type of n1-standard-1.
- Under Networking, choose the following settings:
- Network: Leave at default setting.
- Subnetwork: Leave at default setting.
- Select Attach External IP?.
- Select the following for Boot Disk settings:
- For Image project, choose your Google Cloud project.
- For Image name, select the image you built earlier using Packer.
- Click Save to persist your configuration changes.
6. Configure and run a project
- Click + New Item in the Jenkins interface to create a new job.
- Enter GCPtest as the item name.
- Click Freestyle project, and then click OK.
- Check the Execute concurrent builds if necessary and Restrict where this project can run boxes.
- In the Label Expression field, enter ubuntu-2004.
- In the Build Steps section, click Add build step.
- Click Execute Shell.
- In the command box, enter a test string:
echo "hostname:`hostname`" - Click Save.
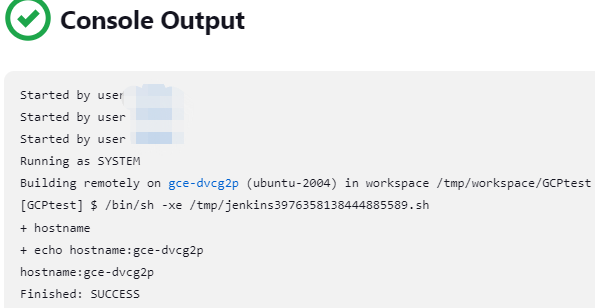
- Click Build Now to start a build.
If successful, the Console output should look like this below:
7. Troubleshoot
If building a project fails, and the prompt is like that:

To troubleshoot, click “Manage Jenkins”->”System Log” to find relevant error logs. Here list one error log and its corresponding solution:
error log:
![]()
solution:
go to “Manage nodes and clouds”->”Configure Clouds”->”Advanced…”, select default on the droplist of Network, and default on the droplist of Subnetwork.
References
[1] “Service accounts | IAM documentation | google cloud,” Google. [Online]. Available: https://cloud.google.com/iam/docs/service-accounts. [Accessed: 11-Dec-2022].
[2] Google Compute engine. [Online]. Available: https://plugins.jenkins.io/google-compute-engine/. [Accessed: 11-Dec-2022].
[3] Jagrat, “Jenkins build jobs - how to create and trigger build jobs in Jenkins?,” TOOLSQA, 11-Dec-2022. [Online]. Available: https://www.toolsqa.com/jenkins/jenkins-build-jobs/. [Accessed: 11-Dec-2022].
[4] “Using Jenkins for distributed builds on Compute engine | cloud architecture center | google cloud,” Google. [Online]. Available: https://cloud.google.com/architecture/using-jenkins-for-distributed-builds-on-compute-engine. [Accessed: 11-Dec-2022].