Last updated by: KostaThomson, Last updated on: 18/08/2024
pFsense Install Guide
Research Piece
Author: Kosta Thomson
Abstract
This document's goal is to show how to create an effective and secure firewall/router using pFsense in a virtual environment that is useful for various testing purposes. This guide shows how to set up a LAN and WAN network interface, configure pFsense, and how to connect another VM to pFsense LAN.
Prerequisites
In order to run a virtual machine, you will first need to enable virtualization. You can see if it's enabled by going to Task Manager -> Performance -> CPU. Then at the bottom, check if Virtualization is enabled.

If it's not enabled, you’ll need to go into your BIOS by pressing F12, F10, DEL or ESCAPE during start up.
Go to the Advanced tab -> CPU Configuration, if you are using an Intel CPU enable Intel Virtualization Technology and if you are using AMD enable AMD-V. Once completed save and exit to restart your PC.
The minimum hardware specifications for a Windows 10 VM are:
-
A modern x86 Processor
-
No less than 4GB of memory
-
At least 20GB of free storage
1. Download pFsense and VirtualBox
Download pFsense from their website, make sure you down their latest version. After successfully downloading pFsense 2.7.2 ISO, make sure you extract it using 7Zip. Then download the latest version of Oracle VirtualBox, or your choice of VM software of choice. This guide we will be using VirtualBox.
2. Creating a New VM
click on New in top right of VirtualBox.

Now configure the following settings in the create virtual machine wizard.
Under Name and Operating System tab:
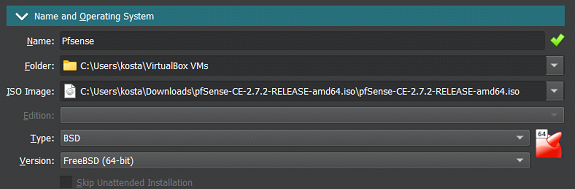
- Give your pFsense VM a name and locate the iso image for pFsense. It may be in your downloads folder if you cannot locate it.
- Type will be BSD and FreeBSD (64-bit) as the version.
- Uncheck Skip Unattended Installation
The minimum hardware requirements for pFsense:
- memory = 1GB
- processors = 1CPU
- Storage = 8GB
Recommeded settings:
- 2GB of memory.
- One processor is completely fine
- 15GB of storage will suffice
You can change your hardware settings at a later date, so if you need more processors or memory, you can add more.
Once completed, click on Finish
3. Configuring the network interfaces
In the top right click Settings -> Network
- Set Adapter 1 to NAT. This will be your WAN for your internet connection
- Click Adapter 2, tick Enable Network Adapter, in the Attached To drop down box select Internal Network. This will be your LAN
- Click Ok to save the settings.
4. Installation process for pFsense
Select pFsense VM and click Start
- Read carefully and Accept the installers copyright notice
- Select the first option Install, highlight ok and press enter
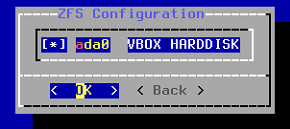
- Select Auto (ZFS) highlight ok and press enter. Note: ZFS does tend to take up more memory, and is slightly faster, so if you are running on minimum specs, you can choose Auto (UFS), although a power outage can cause corruption if you are using UFS.
- For Configuration Options page leave the settings as default, highlight select and press enter
- Choose the first option Stripe, highlight ok and press enter
- Press spacebar to select your VirtualBox hard disk, highlight ok and press enter
- Select Yes and press enter to destroy the current contents on your hard disk, this will start the install process, you wont be able to go back, so make sure all the settings are correct before moving forward.
- Once the install is completed you will be prompted to reboot. BEFORE you do this, you need to unmount your iso for pFsense, if you fail to do this you will have to restart to step one.
- In the top left click Device -> Optical Drives -> Select your ISO file for pFsense -> Select Force Unmount -> Now select Reboot in your pFsense VM -> Type Exit
- Turn on your pFsense VM, your home page should look similar to this image.
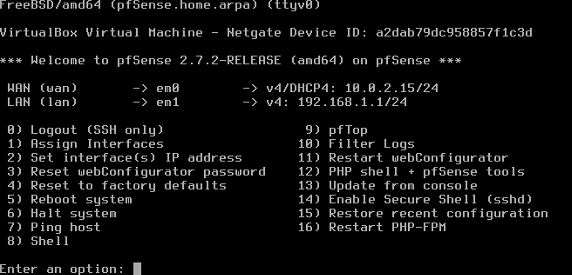
Note: your WAN and LAN IP addresses may be different to the image above, that is fine.
5. Connecting another windows VM to pFsense
- Download a Windows 10 VM (or any VM OS of your choice). You can find the ISO Here
- When creating Widows 10 VM, Type = Microsoft Windows, Version = Windows 10 (64-bit)
- Recommended requirements for windows 10 VM:
- Memory = 4GB
- Processors = 2 CPUs
- Storage = 20GB
- Once you downloaded windows 10 VM select the Settings option then go to the Network panel. Select the Settings option -> Network
- Change Adapter 1 to Internal Network so your vm can connect to your Lan
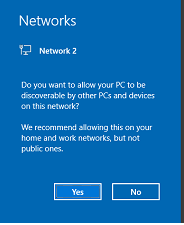
- Turn on your Windows 10 VM, select Yes to network discoverability.
If done correctly your pFsense network will be automatically connected. If you do not have network discoverability on, you can navigate to Control Panel -> Network and Internet -> Network and Sharing Center -> Advanced Sharing Setting Then turn on Network Discovery.
- Type your pFsense LAN IP address into your browser. If all steps are done correctly, you should see this in your browser.

- Username: admin
- Password: pfsense
Now you have successfully installed pFsense to your virtual network.
6. Troubleshooting
If you have issues with installing pFsense iso due to Negate, you can also install the latest version without NetGate from here: Link
If you get this error at part 4 step 8, click Machine -> Reset
vm_fault: page read error, pid 1 (init)
vm_fault: page read error, pid 1 (init)
vm_fault: page read error, pid 1 (init)
vm_fault: page read error, pid 1 (init)
If you are facing other issues that are not here, you can find more troubleshooting guides using NetGate Docs: Netgate Docs